Welcome to TypeShift
TypeShift is a macOS text expander — type a short abbreviation anywhere on your Mac and it instantly expands into whatever text you want. This guide covers everything from your first snippet to advanced AI-powered macros.
Installation
TypeShift is distributed as a signed and notarized disk image — no App Store required.
-
1Download TypeShift.dmg from typeshift.monogramcreative.co.
-
2Open the DMG and drag TypeShift into your Applications folder.
-
3Launch TypeShift from Applications or Spotlight. macOS may ask you to confirm opening an app downloaded from the internet — click Open.
-
4Grant Accessibility access when prompted. This is required for system-wide expansion — see the next section for details.
TypeShift will add itself to Login Items automatically so it's always running when you log in.
Accessibility Permission
TypeShift monitors keyboard input system-wide so it can detect when you type an abbreviation and replace it with your snippet. macOS requires you to explicitly grant Accessibility access for this to work — it does not happen silently.
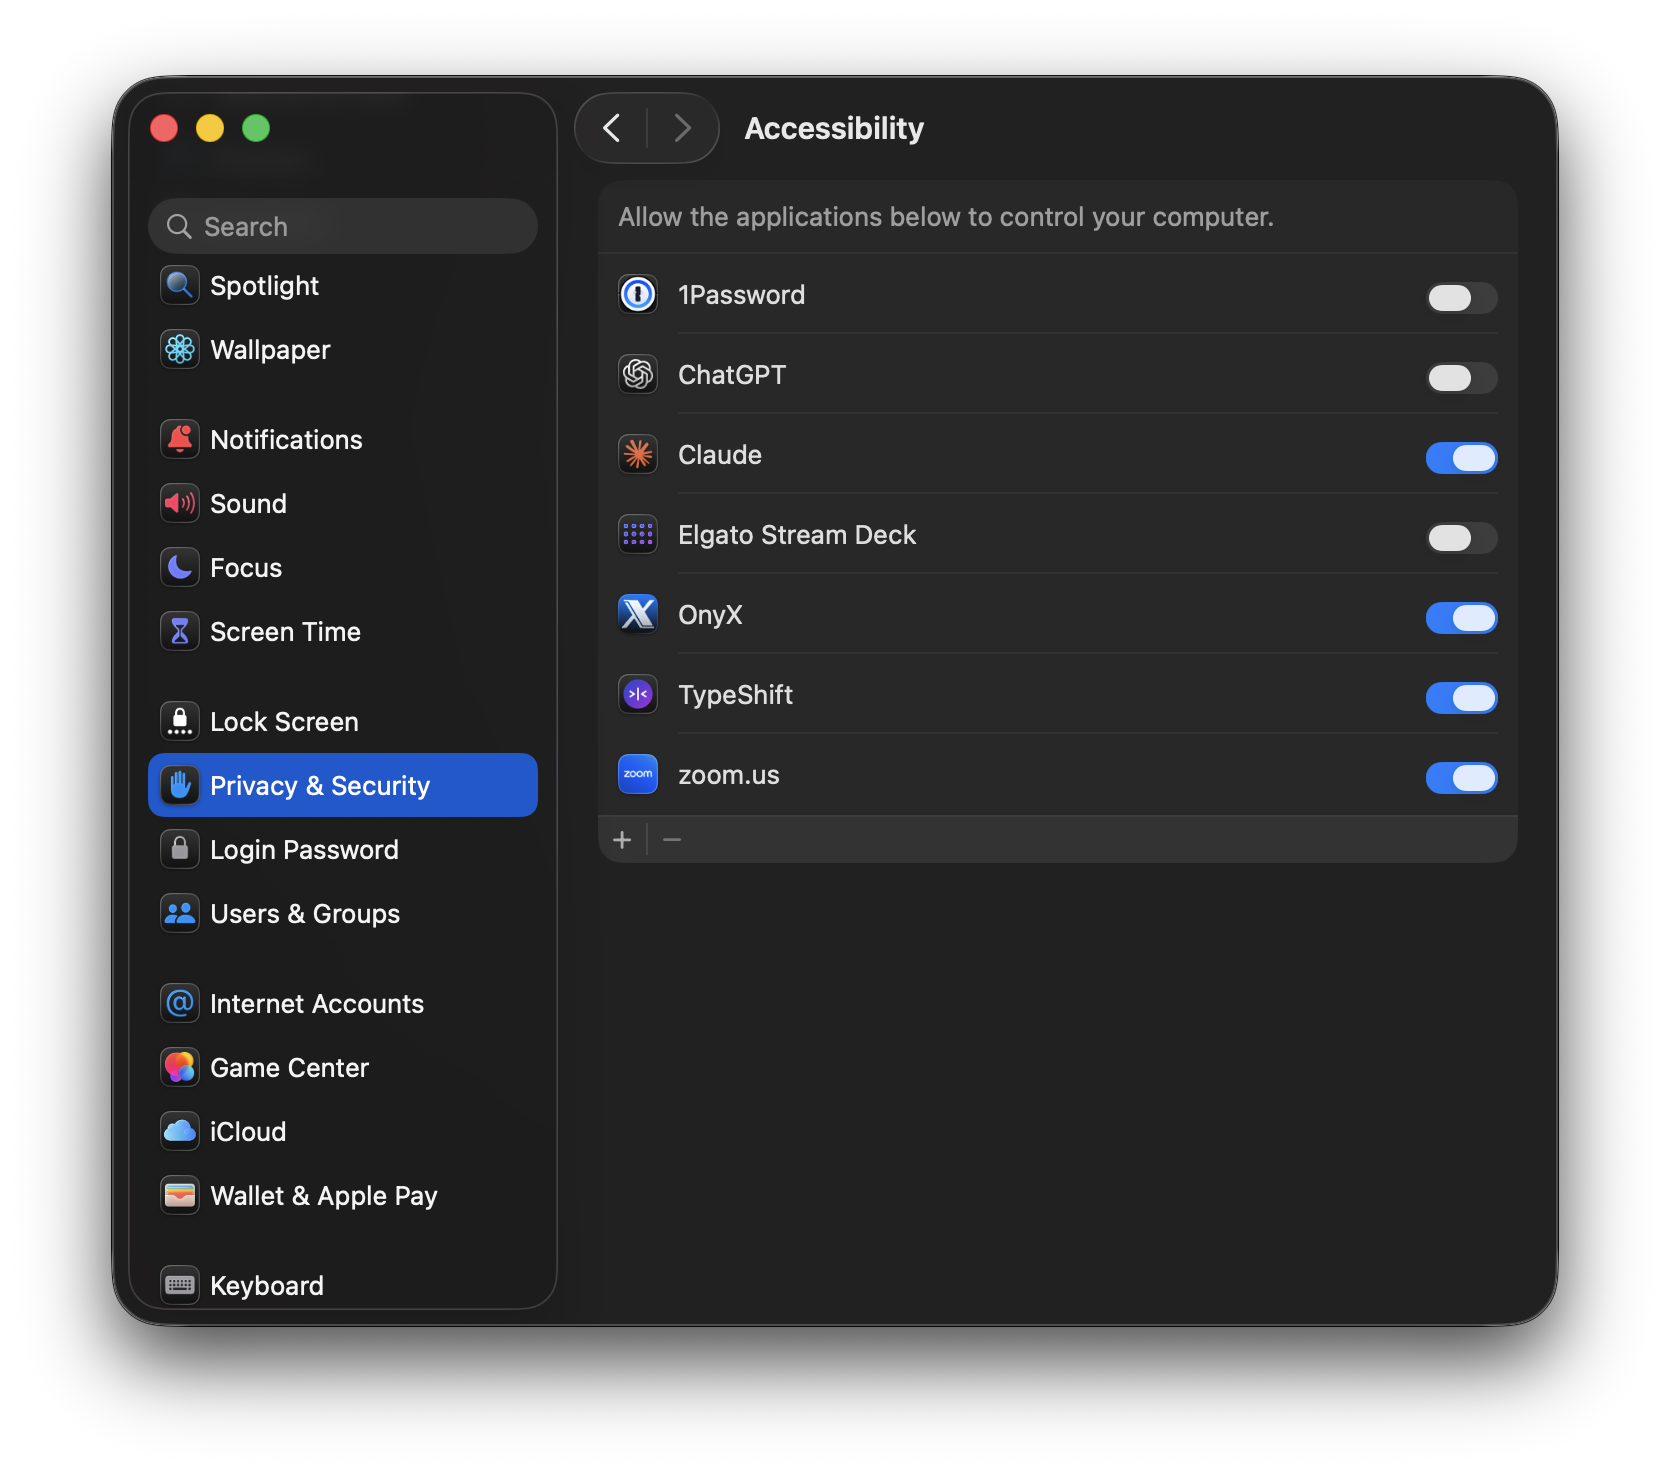
TypeShift listed and toggled on in System Settings → Privacy & Security → Accessibility.
Granting access
-
1Open System Settings → Privacy & Security → Accessibility.
-
2Click the + button and add TypeShift, or find it in the list and toggle it on.
-
3Return to TypeShift — expansion will start working immediately. No restart required.
Your First Snippet
Creating a snippet takes about 30 seconds. Here's the quick version:
-
1Click the TypeShift icon in your menu bar, then click Open TypeShift (or press the keyboard shortcut shown there).
-
2Click the + button in the snippet list to create a new snippet.
-
3Give it a Title (e.g. "My Email"), an Abbreviation (e.g.
!em), and type your expanded content in the text area. -
4Click Save.
-
5Open any app — Mail, Notes, a browser — and type your abbreviation. The moment you finish typing it, TypeShift replaces it with your snippet.
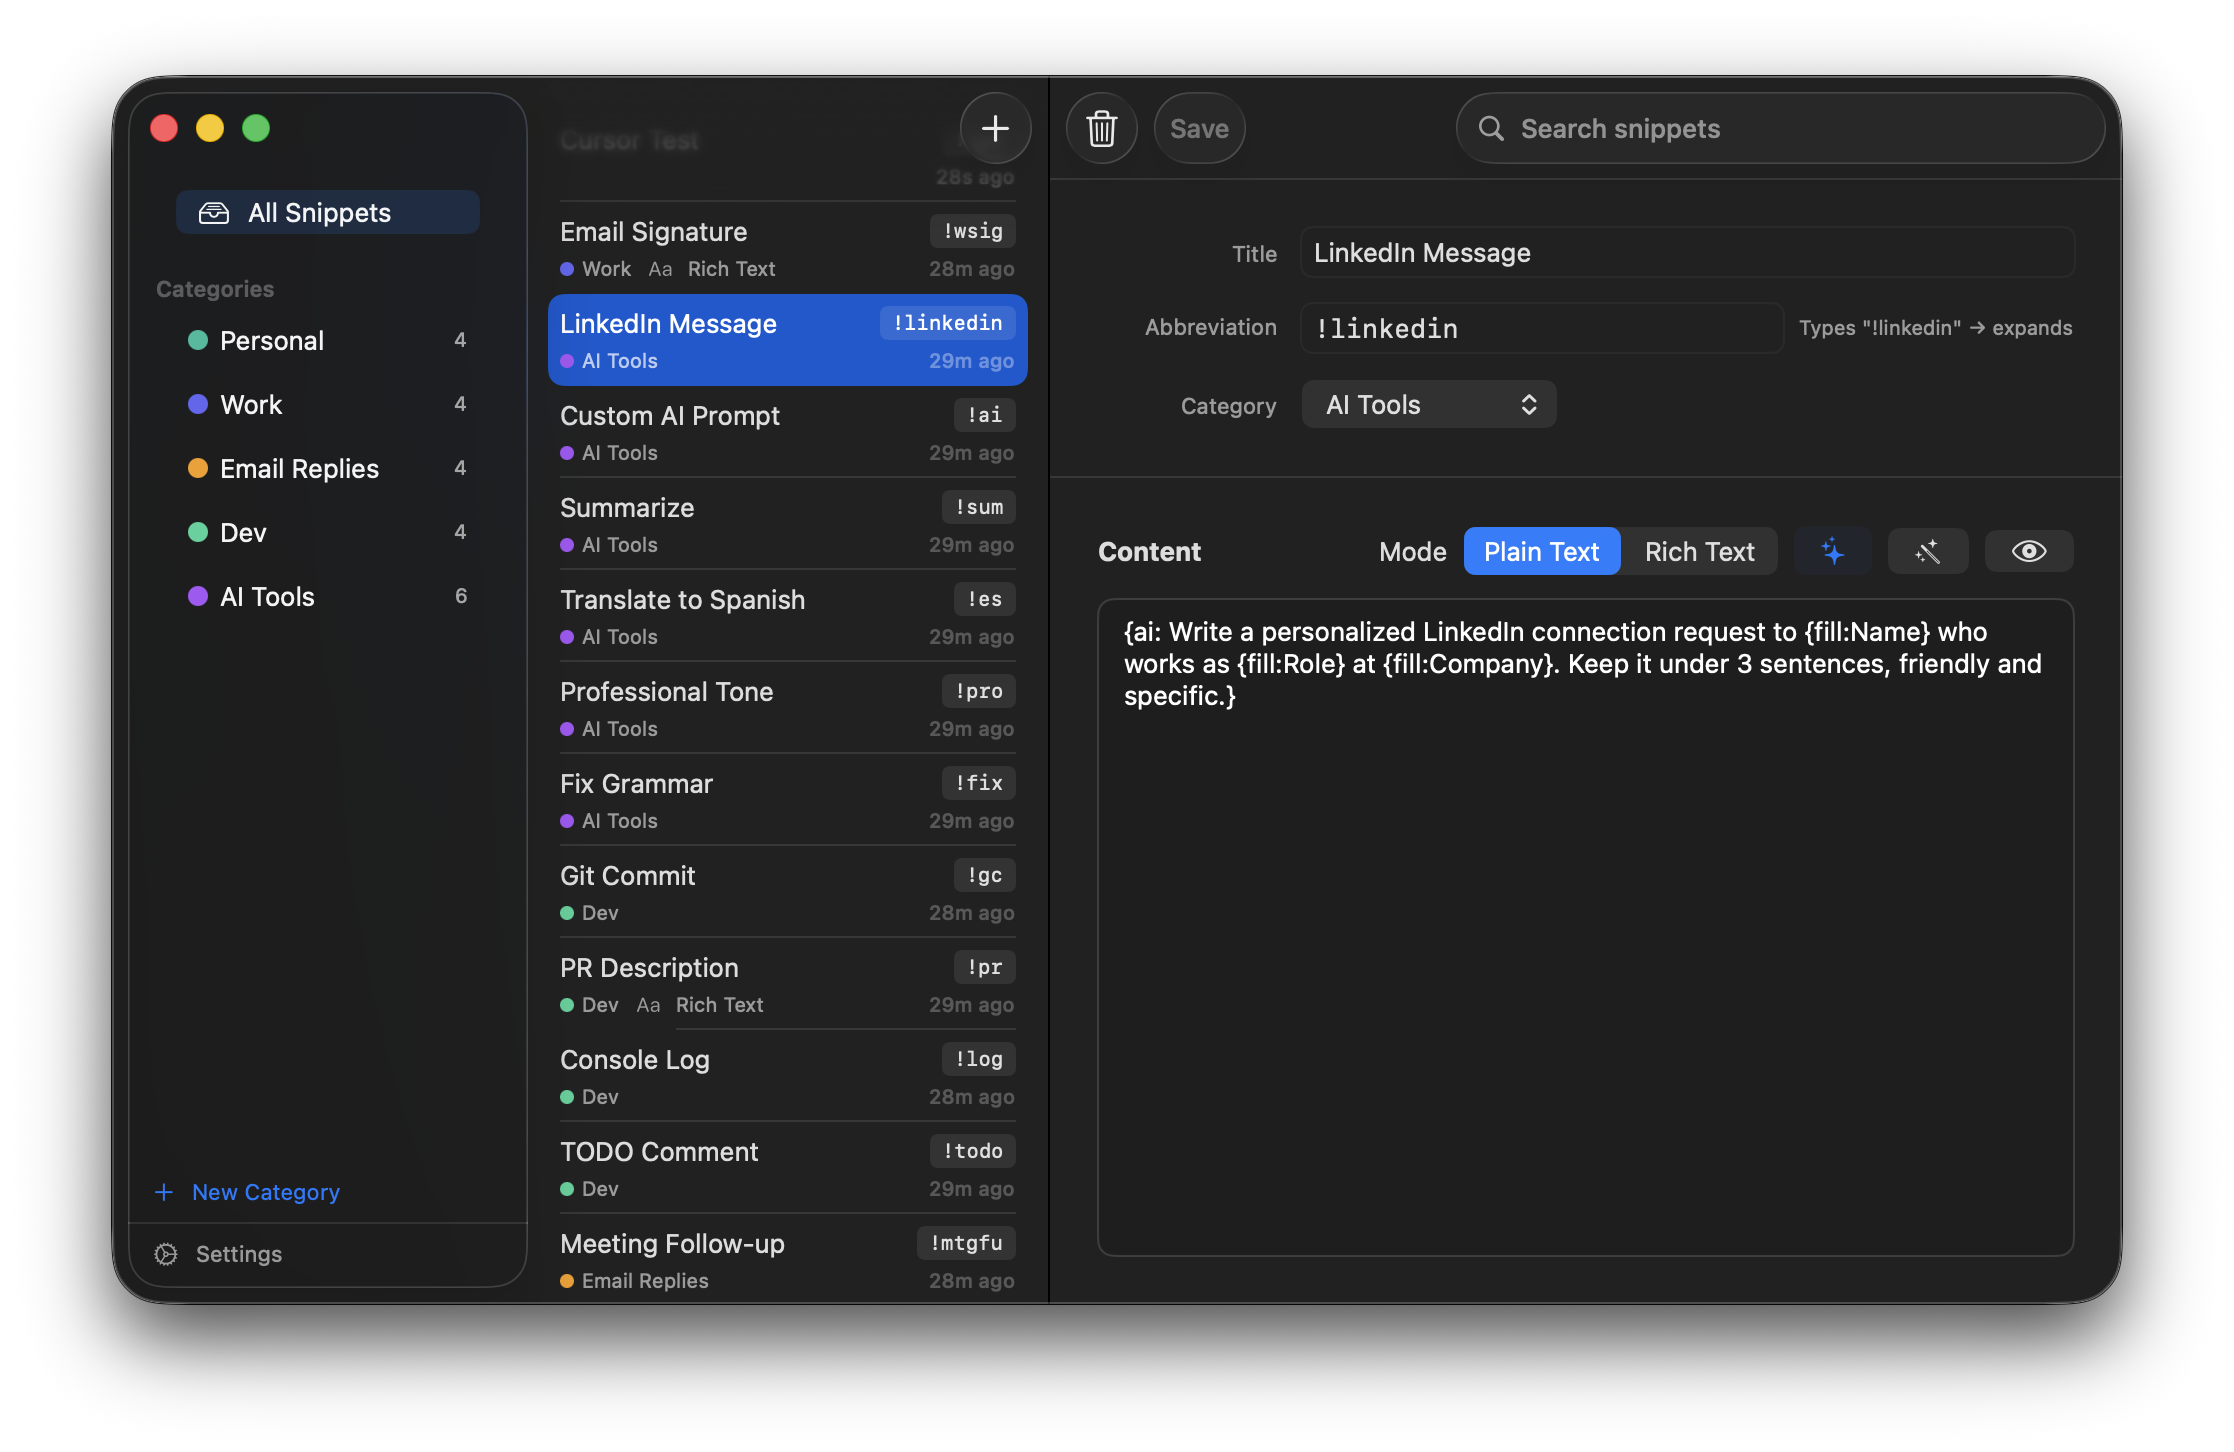
The TypeShift main window: categories on the left, snippet list in the middle, editor on the right.
Managing Snippets
Snippets are the core of TypeShift — each one pairs an abbreviation with a block of text that gets typed for you. They can be plain text, formatted rich text, or anything in between.
Creating & Editing
To create a snippet, click the + button at the bottom of the snippet list. To edit an existing one, select it from the list.
Each snippet has three required fields:
| Field | Purpose |
|---|---|
| Title | A human-readable name shown in the snippet list. Not used for expansion. |
| Abbreviation | The short text you type to trigger expansion. Case-sensitive. |
| Content | What gets typed when the abbreviation fires. Plain or rich text. |
Click Save (or press ⌘S) to save changes. TypeShift will warn you if you try to navigate away with unsaved edits.
Plain Text vs Rich Text
TypeShift supports two content modes per snippet:
Plain text
The default. TypeShift types the characters directly as if you pressed the keys yourself. Works reliably in every app — Terminal, code editors, web forms, anything.
Rich text
Lets you apply bold, italic, underline, font size, text color, and hyperlinks. TypeShift pastes the formatted content via the clipboard, so it appears with formatting in apps that support it (Mail, Pages, Word, Slack, most text editors).
To switch a snippet between modes, use the Plain / Rich toggle at the top of the editor. Switching from rich to plain will strip formatting but preserve the text content.
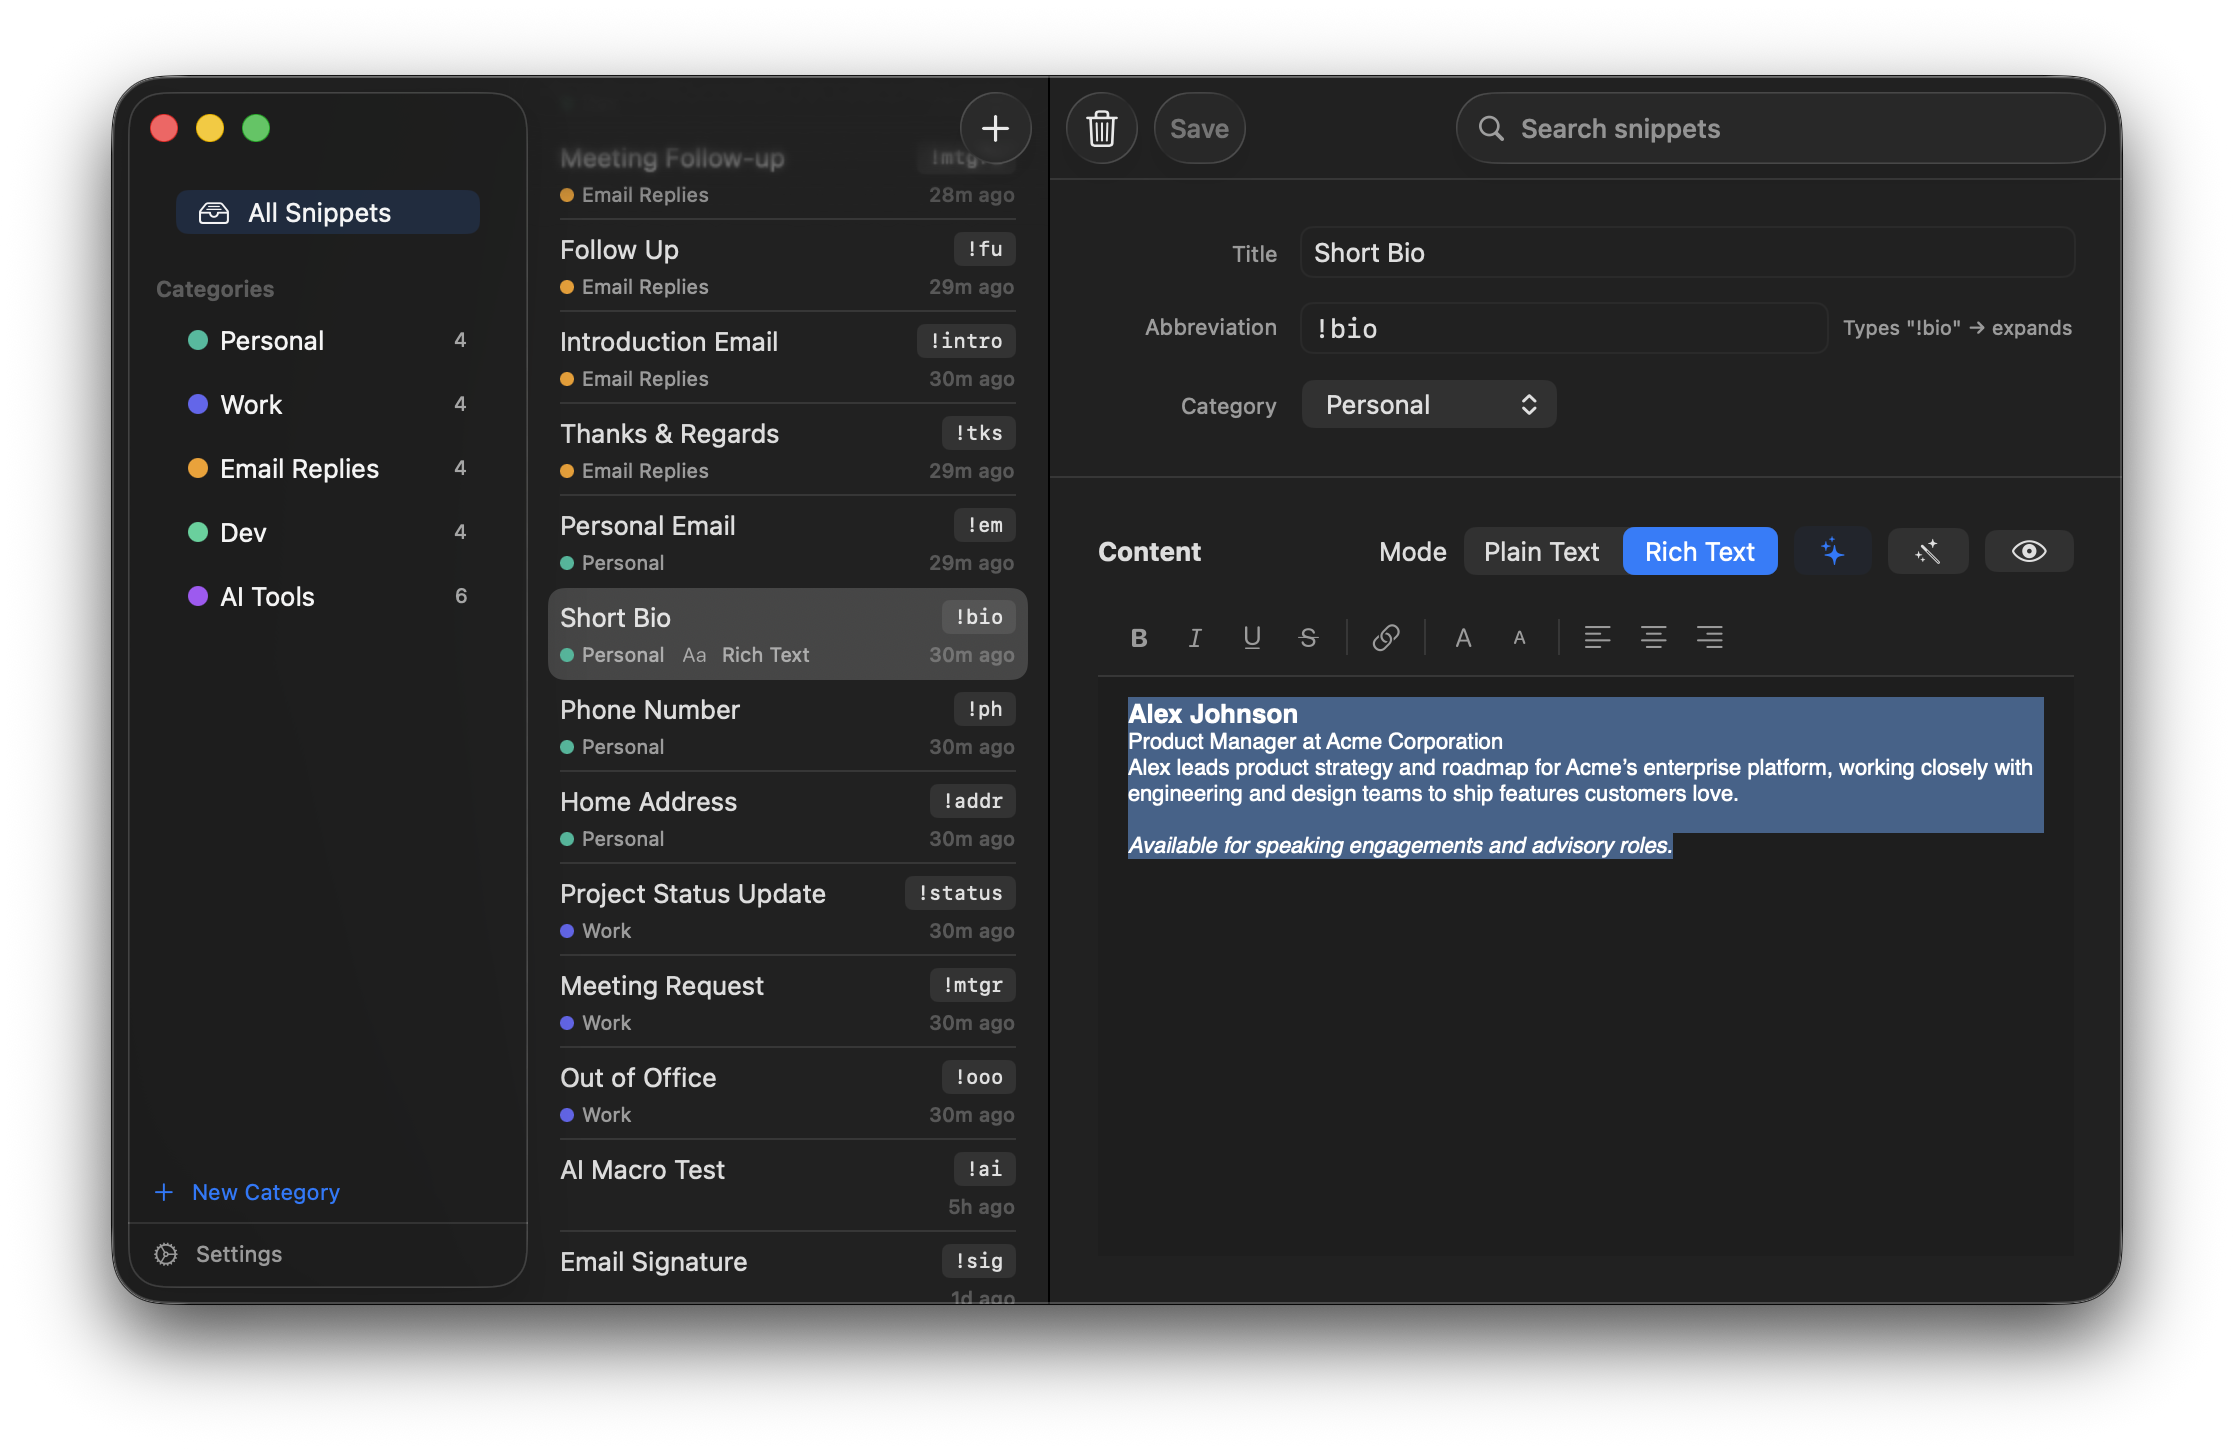
The rich text editor with formatting toolbar. Use ⌘B, ⌘I, ⌘U for bold, italic, and underline.
Abbreviation Tips
A good abbreviation fires reliably and never triggers by accident. A few conventions that work well:
Use a prefix character
Starting every abbreviation with a character that doesn't appear at the start of real words prevents accidental expansions. Common choices:
!—!em,!sig,!addr;—;em,;sig//—//date,//reply
Keep them short but distinct
Two or three characters after the prefix is usually enough. !em for email, !ph for phone, !addr for address. Avoid prefixes of each other — if you have !s and !sig, !s will always fire before you can finish typing !sig.
Enable & Disable
You can temporarily disable a snippet without deleting it. A disabled snippet stays in your library but its abbreviation won't trigger expansion.
To toggle a snippet, select it in the list and click the lightswitch icon in the editor toolbar (to the right of the Save button). A green icon means the snippet is active; a gray icon means it's paused.
Disabled snippets appear dimmed in the snippet list with a small pause indicator, so you can tell at a glance which ones are active.
App Rules
App Rules let you control which apps a snippet expands in. By default every snippet is Global — it expands anywhere on your Mac. You can narrow or restrict that on a per-snippet basis.
Setting a rule
Select a snippet and click the filter icon (⊜) in the editor toolbar, to the right of the enable/disable toggle. The App Rules sheet has three modes:
- Global — expands in all apps (default)
- Include Only — expands only when one of the listed apps is in the foreground
- Exclude — expands everywhere except when one of the listed apps is in the foreground
Adding apps
Choose Include Only or Exclude, then click Add App. A file browser opens — navigate to /Applications (or anywhere else on your Mac) and select the .app you want. Repeat to build a list. Each mode maintains its own independent list, so switching between Include Only and Exclude doesn't mix or clear your entries.
When an app isn't installed
If a rule references an app that isn't installed on the current Mac — for example, a rule synced from another machine via iCloud — the app appears in the list with a "Not installed on this Mac" label. The rule is fully preserved and will take effect if the app is ever installed. Nothing is removed automatically.
Bulk apply
Select multiple snippets and the bulk edit panel includes a Set App Rules… button. This opens the same sheet and stamps the chosen rule onto all selected snippets at once.
Multi-Select
Select multiple snippets to perform bulk operations — move them to a different category, enable or disable them all at once, or delete them in one step.
Selecting snippets
- ⌘-click — add or remove individual snippets from the selection
- Shift-click — select a contiguous range
- ⌘A — select all snippets in the current view
Bulk actions
When two or more snippets are selected, the detail panel switches to a bulk edit view with three sections:
- Move to category — reassign all selected snippets to any category, or remove their category assignment
- Enable / Disable — enable all, disable all, or a mix depending on the current state
- App Rules — apply the same app rule (Global, Include Only, or Exclude) to all selected snippets at once
- Delete — move all selected snippets to Recently Deleted
You can also press the Delete key with snippets selected to delete them (with a confirmation prompt).
Sharing Snippets
Share individual snippets with other TypeShift users as .typeshift files — lightweight JSON files that contain everything needed to recreate the snippet on another Mac.
Exporting a snippet
There are two ways to export:
- Toolbar button — select a snippet and click the share icon (↑) in the snippet list toolbar
- Right-click — right-click any snippet in the list and choose Share Snippet…
A save dialog appears with the snippet's title as the default filename. Choose a location and click Save. The exported .typeshift file includes the snippet's title, abbreviation, content (plain or rich text), and category information.
Importing a snippet
Double-click any .typeshift file, or open it from Finder. TypeShift shows an import confirmation sheet with a preview of the snippet and options for handling the category:
- If the snippet's category already exists in your library, it's automatically selected
- If the category doesn't exist, you can create it, choose an existing category, or import without a category
- If the abbreviation conflicts with an existing snippet, a warning is shown before import
.typeshift file extension is automatically registered when TypeShift is installed — just double-click the file to open the import sheet.Categories
Categories let you group snippets and filter the list. Each category gets a name and a color — the color dot shows in the sidebar and in the snippet list.
To create a category, click the New Category button at the bottom of the sidebar. To assign a snippet, open it in the editor and choose a category from the dropdown.
Snippets not assigned to a category appear under All Snippets. You can also view all snippets regardless of category by selecting All Snippets at the top of the sidebar.
Drag a snippet onto a category
The quickest way to file a snippet is to drag it from the snippet list onto a category in the sidebar. The category highlights as you hover over it; release to drop. This works whether the snippet had no category or you're moving it from one category to another.
To move several snippets at once, select them first (⌘-click or Shift-click in the list), then drag any one of the selected snippets onto a category — the whole selection moves together. If you drag a snippet that isn't part of the selection, only that one snippet moves.
Filtering categories
When you have more than one category, a search field appears above the category list. Type to filter categories by name — the list updates instantly as you type. Click the ✕ button to clear the filter.
Sorting categories
Click the sort icon (↑↓) next to the search field to change how categories are ordered. Three sort options are available:
| Sort option | What it does |
|---|---|
| Alphabetical | Sort categories by name (A–Z or Z–A) |
| Date Created | Sort by when the category was created (oldest or newest first) |
| Snippet Count | Sort by how many snippets are in each category (fewest or most first) |
Click the same sort option again to toggle between ascending and descending order — a small arrow indicator shows the current direction. Your sort preference is saved and persists across app restarts.
Recently Deleted
When you delete a snippet or category, it isn't removed immediately — it moves to Recently Deleted, where it stays for 30 days before being permanently erased. This gives you a safety net to recover anything deleted by mistake.
Accessing Recently Deleted
Click Recently Deleted at the bottom of the sidebar. You'll see two sections — Categories and Snippets — each with a countdown badge showing how many days remain before permanent deletion.
- Gray badge — more than 7 days remaining
- Orange badge — 7 days or fewer remaining
- Red badge / "Today" — deletes today
Restoring items
Click any item to preview it, then click Restore. The snippet or category returns to its original location. If a snippet's category was also deleted, restoring the snippet automatically restores the category too.
Bulk restore or delete
Select multiple items using ⌘-click or Shift-click (or ⌘A to select all), then use the Restore All or Delete All Permanently buttons that appear in the detail panel. You can also press the Delete key to permanently erase all selected items.
Permanent deletion
To immediately and permanently erase an item, click it and choose Delete Permanently. This cannot be undone. Items are also automatically purged after their 30-day window expires — TypeShift cleans these up each time it launches.
Snippets in Recently Deleted are inactive — their abbreviations won't trigger expansion. They're fully restored the moment you click Restore.
Backups include Recently Deleted
When you export a backup (Settings → Backup & Sync → Export Now), deleted items are included with their original deletion timestamp. Importing the backup on another Mac restores them to Recently Deleted with the same countdown, so nothing is lost.
Keyboard Shortcuts
These shortcuts work when the TypeShift window is active.
App shortcuts
| Shortcut | Action |
|---|---|
| ⌘N | New snippet |
| ⌘F | Focus the search field |
| ⌘S | Save current snippet |
| ⌘A | Select all snippets in the list |
| ⌘-click | Add individual snippets to selection |
| Shift-click | Select a range of snippets |
| Delete | Delete selected snippet(s) |
| ⌘, | Open Settings |
Rich text editor
These shortcuts are available when editing a rich text snippet.
| Shortcut | Action |
|---|---|
| ⌘B | Bold |
| ⌘I | Italic |
| ⌘U | Underline |
| ⌘⇧X | Strikethrough |
| ⌘K | Insert or edit a link |
Macros
Macros are special tokens you embed in snippet content. When the snippet expands, each token is replaced with a dynamic value — today's date, clipboard contents, a prompt for user input, and more.
Overview
All macro tokens use curly-brace syntax: {token} or {token:parameter}. They work in both plain and rich text snippets.
| Token | What it inserts |
|---|---|
{date} | Today's date — April 17, 2026 |
{date:MM/dd/yyyy} | Today's date in a custom format |
{time} | Current time — 10:30 AM |
{time:HH:mm} | Current time in a custom format |
{clipboard} | Contents of the clipboard at expansion time |
{cursor} | Where the cursor lands after expansion — works in most standard macOS apps |
{fill:Label} | Pauses expansion and asks for typed input |
{snippet:abbrev} | Inline-expands another snippet by abbreviation |
{shortcut:⌘K} | Fires a keyboard shortcut in the target app after expansion |
To insert a macro token into a snippet, position your cursor in the content area and click the Insert Macro button in the toolbar (the {…} icon). This opens a picker with all available tokens.
Date & Time
{date} inserts the current date in Month D, YYYY format. {time} inserts the current time in h:mm AM/PM format.
Custom formats
Add a colon followed by a Unicode date format string to control the output:
| Token | Example output |
|---|---|
{date} | April 17, 2026 |
{date:MM/dd/yyyy} | 04/17/2026 |
{date:yyyy-MM-dd} | 2026-04-17 |
{date:EEEE, MMMM d} | Friday, April 17 |
{date:d MMM yyyy} | 17 Apr 2026 |
{time} | 10:30 AM |
{time:HH:mm} | 10:30 |
{time:h:mm:ss a} | 10:30:45 AM |
The macro picker's date and time presets show a live preview of each format before you insert it.
Clipboard
{clipboard} is replaced with whatever text is on your clipboard at the moment the snippet fires.
A common use: copy something to the clipboard, then fire a snippet that wraps it in a template.
-- Snippet: "Reply with quote"  abbreviation: !rq --
Thanks for your message. You wrote:

  "{clipboard}"

Here's my response...
TypeShift captures the clipboard value at the moment the abbreviation is typed, before any expansion happens, so the value is always what you copied — not something TypeShift itself put there.
Cursor Position
{cursor} marks where the text cursor should land after expansion. Place it anywhere in the snippet content.
Hi {fill:Name},

{cursor}

Best,
James
In this example, after expansion the cursor lands between the greeting and the sign-off so you can type the body of your message immediately without clicking.
If a snippet has no {cursor} token, the cursor lands at the end of the expanded text.
{cursor} works in most standard macOS apps. In apps that use a custom text engine, the cursor may land at the end of the expanded text instead of the {cursor} position. The in-app macro picker notes this when you insert the token.
Fill-in Fields
{fill:Label} pauses the expansion and shows a small floating panel asking you to type a value. Once you type the value and press Return, expansion resumes with your input substituted in.
Hi {fill:First name},

Thanks for reaching out about {fill:Topic}.
I'll get back to you by {date}.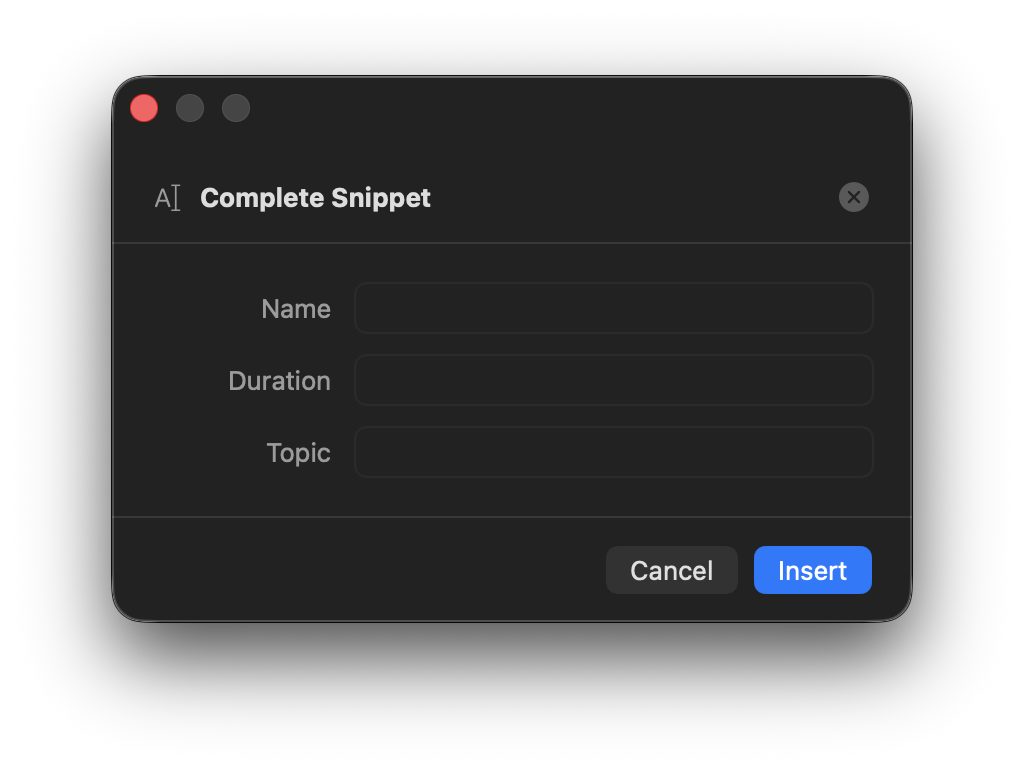
The fill-in panel appears near your cursor. Type the value and press Return to continue.
Multiple fill-in fields
You can have as many {fill:…} tokens as you like in one snippet. TypeShift collects all the values first — showing each field's label as a prompt — and only then performs the final expansion with all values substituted simultaneously.
Reusing the same field
If two tokens share the same label — {fill:Name} appearing twice — TypeShift asks for the value once and uses it in both places. The label is the identity, not just a hint.
Nested Snippets
{snippet:abbrev} expands another snippet inline. The referenced snippet's content is inserted at that position, with its own macros resolved.
-- Snippet: "Support reply"  abbreviation: !support --
Hi {fill:Name},

{cursor}

{snippet:!sig}
Here {snippet:!sig} embeds your email signature snippet, so you never have to maintain it in multiple places.
{snippet:…} will not further expand its own {snippet:…} tokens.Keyboard Shortcut
{shortcut:keys} fires a keyboard shortcut in the target app immediately after the snippet finishes expanding. Use it to trigger an action in the app you're typing into — like applying formatting or opening a menu — without leaving the keyboard.
The parameter is the shortcut written with standard modifier symbols: ⌘ Command, ⌥ Option, ⌃ Control, ⇧ Shift, followed by the key.
| Token | What it does |
|---|---|
{shortcut:⌘K} | Opens the "Insert Link" dialog in most rich-text apps |
{shortcut:⌘B} | Toggles bold |
{shortcut:⌃⇧K} | Fires ⌃⇧K in the target app (e.g. delete line in VS Code) |
Examples
Insert a URL and immediately open the link dialog in Notion, Bear, or any Markdown editor:
-- Snippet: "Link template"  abbreviation: !link --
{shortcut:⌘K}
Expand a snippet and bold it in one step:
-- Snippet: "Bold disclaimer"  abbreviation: !disc --
{shortcut:⌘B}Not financial advice.{shortcut:⌘B}Combining Macros
All macro types can be mixed freely in one snippet. Here's a more complex real-world example:
-- Snippet: "Meeting follow-up"  abbreviation: !mtgfu --
Hi {fill:Name},

Great meeting with you on {date:EEEE, MMMM d}.

As discussed: {cursor}

Next steps:
- {fill:Action item} by {fill:Due date}

{snippet:!sig}
When this fires, TypeShift collects Name, Action item, and Due date in sequence, then expands everything at once — with today's date formatted as "Friday, April 17" and the cursor landing at the "As discussed:" line ready for you to type.
Macro Studio Beta
Macro Studio lets you build your own reusable macros using a formula editor — combine text, built-in macros, and SQL-like functions into a named macro, then drop it into any snippet with a single token, just like a built-in.
Overview
If you find yourself repeating the same combination of macros across many snippets — a signature block, a formatted date stamp, a cleaned-up clipboard value — Macro Studio turns that pattern into one reusable macro. Edit the macro once, and every snippet that uses it picks up the change.
Macro Studio is on by default. Click Macro Studio in the sidebar to open it. You can disable it under Settings → General → Macro Studio if you don't need it.
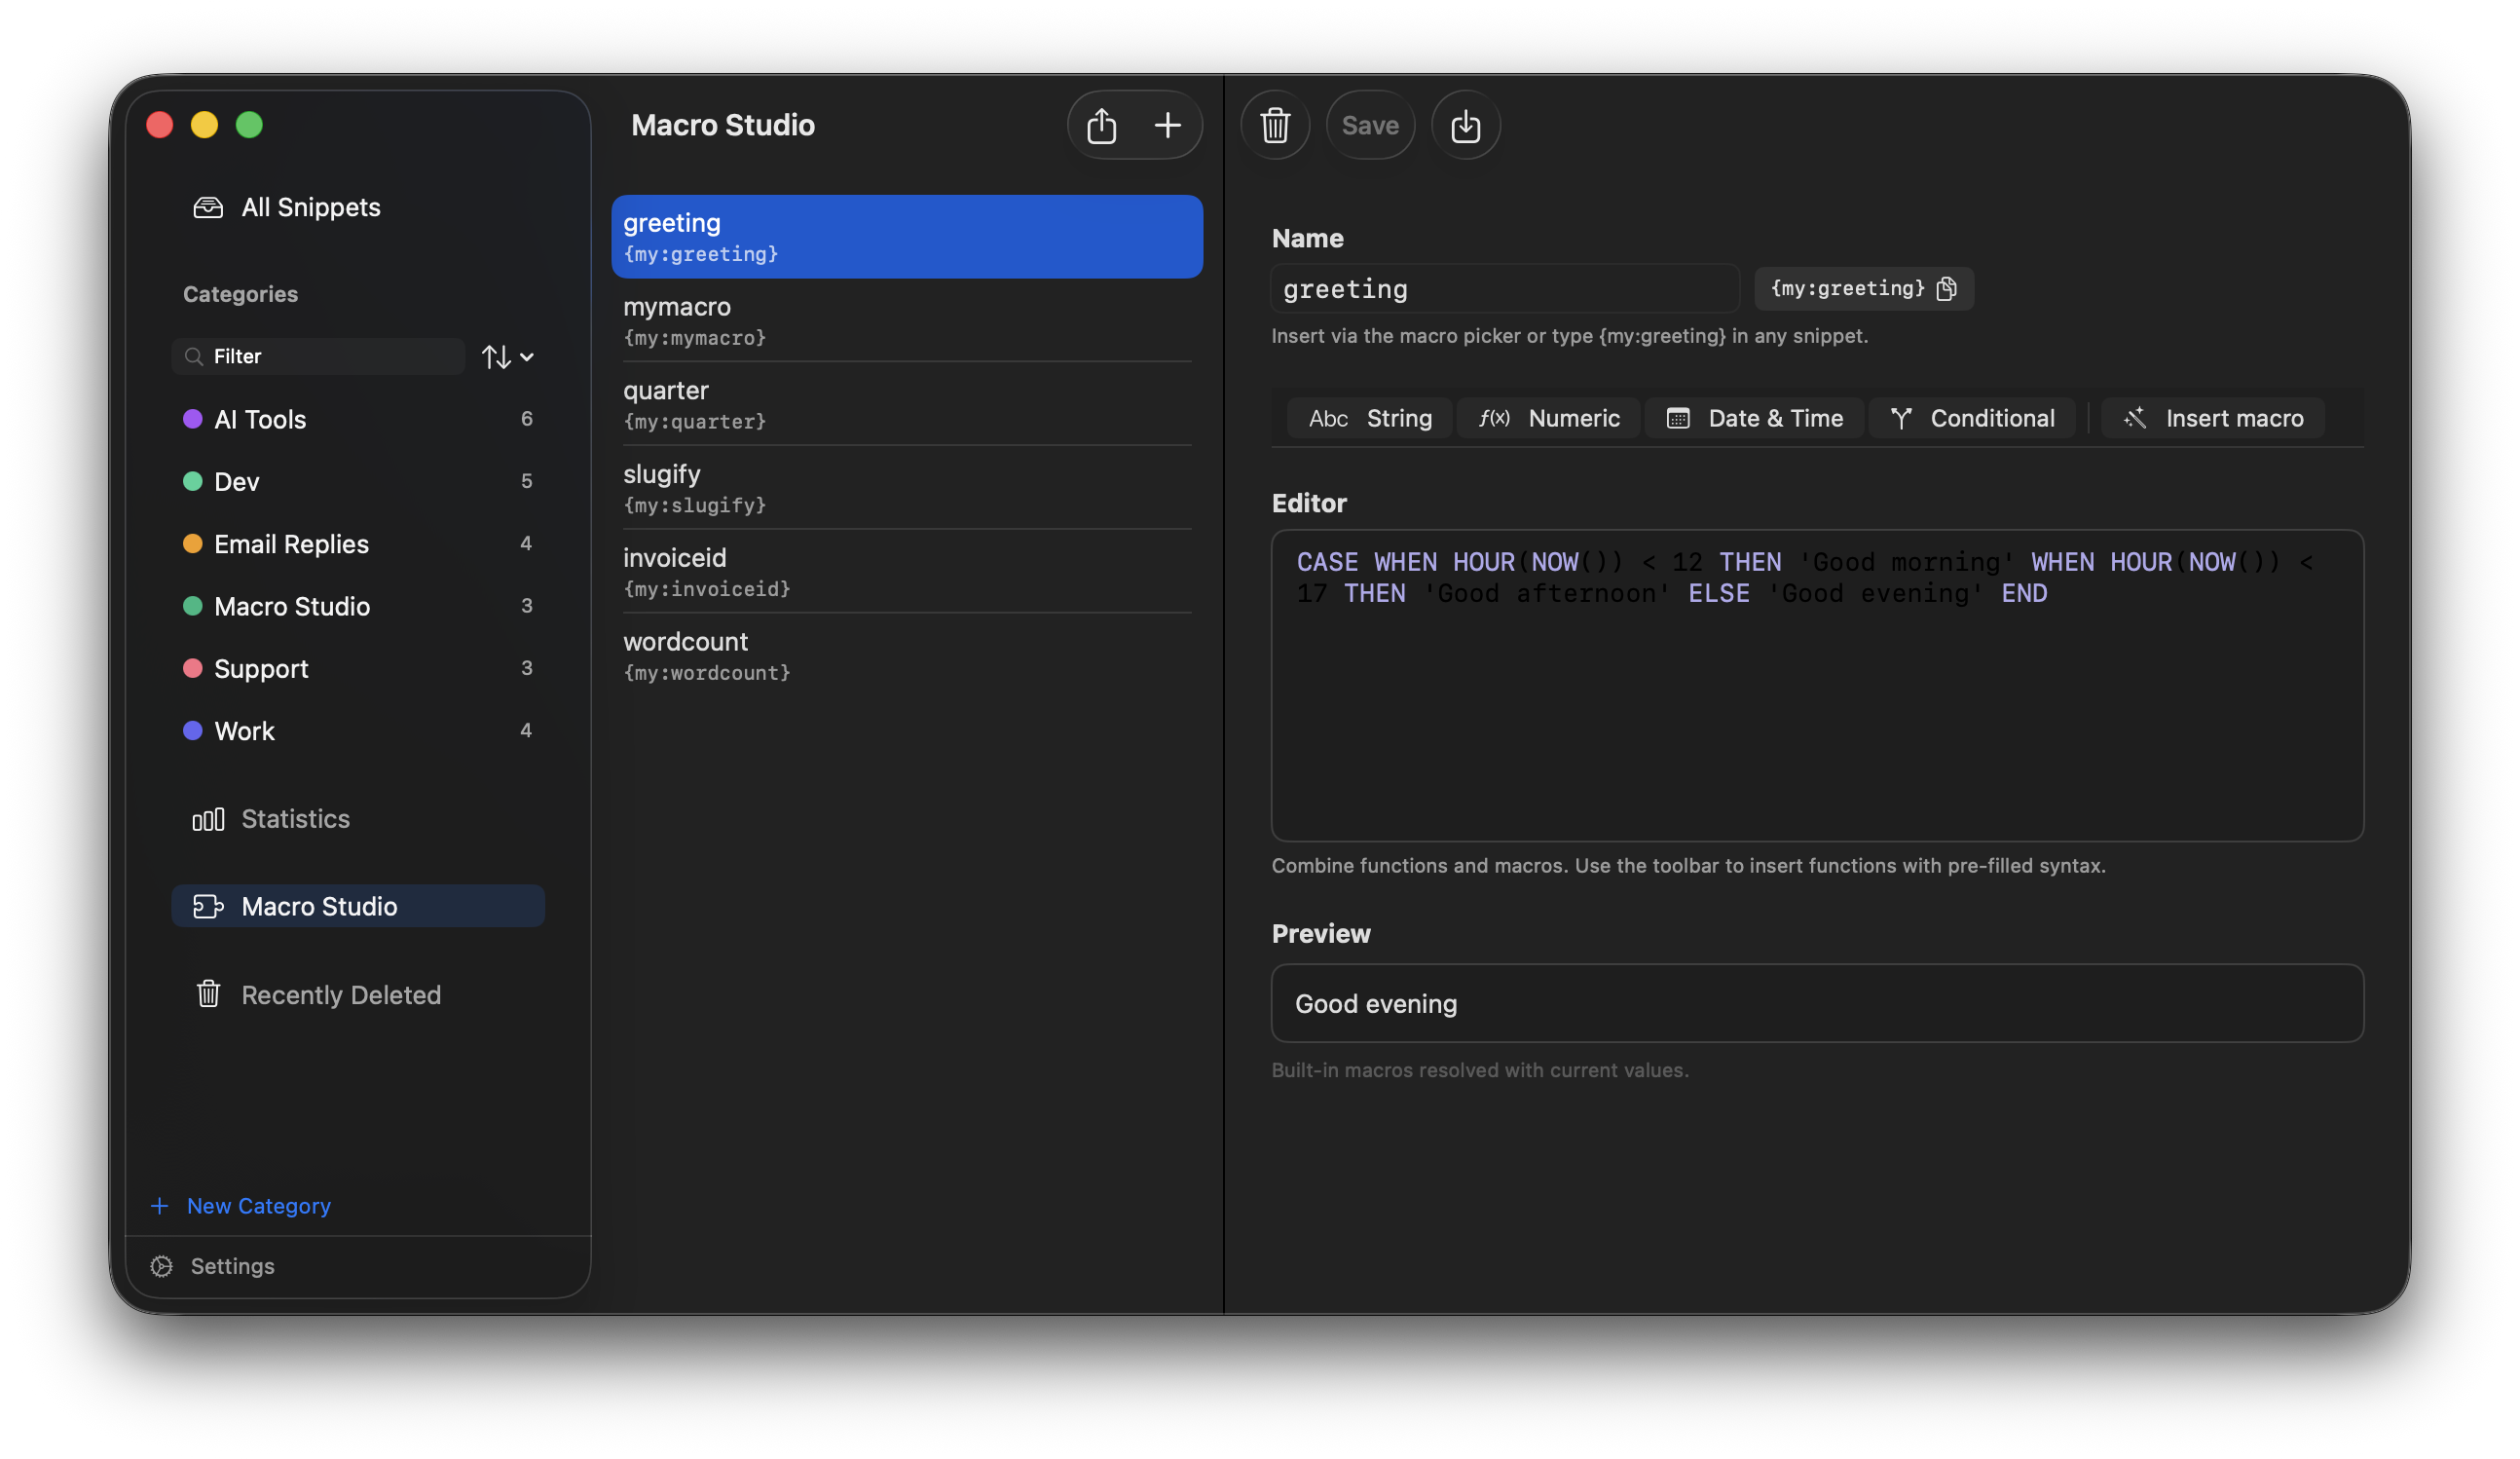
Macro Studio: your macro library in the middle column, the editor with live preview on the right.
Your custom macros sync through iCloud (when iCloud sync is enabled) and are included in JSON backups, alongside your snippets.
Creating a Macro
-
1Click + in the Macro Studio toolbar to create a new macro.
-
2Name it. Names start with a letter and can contain letters, numbers, hyphens, and underscores — e.g.
sigblockorclean-quote. The name becomes part of the token you'll type, like{my:sigblock}. -
3Write the formula. Use the function toolbar to insert functions with pre-filled syntax, or type directly. Mix plain text, functions, and built-in macros like
{clipboard}or{date}freely. The live preview at the bottom resolves everything in real time. -
4Save. Click Save (or ⌘S). The token is now available in any snippet.
-- Macro: "sigblock" --
Best regards,
Alex Rivera
Acme Design Co. · {date:MMMM yyyy}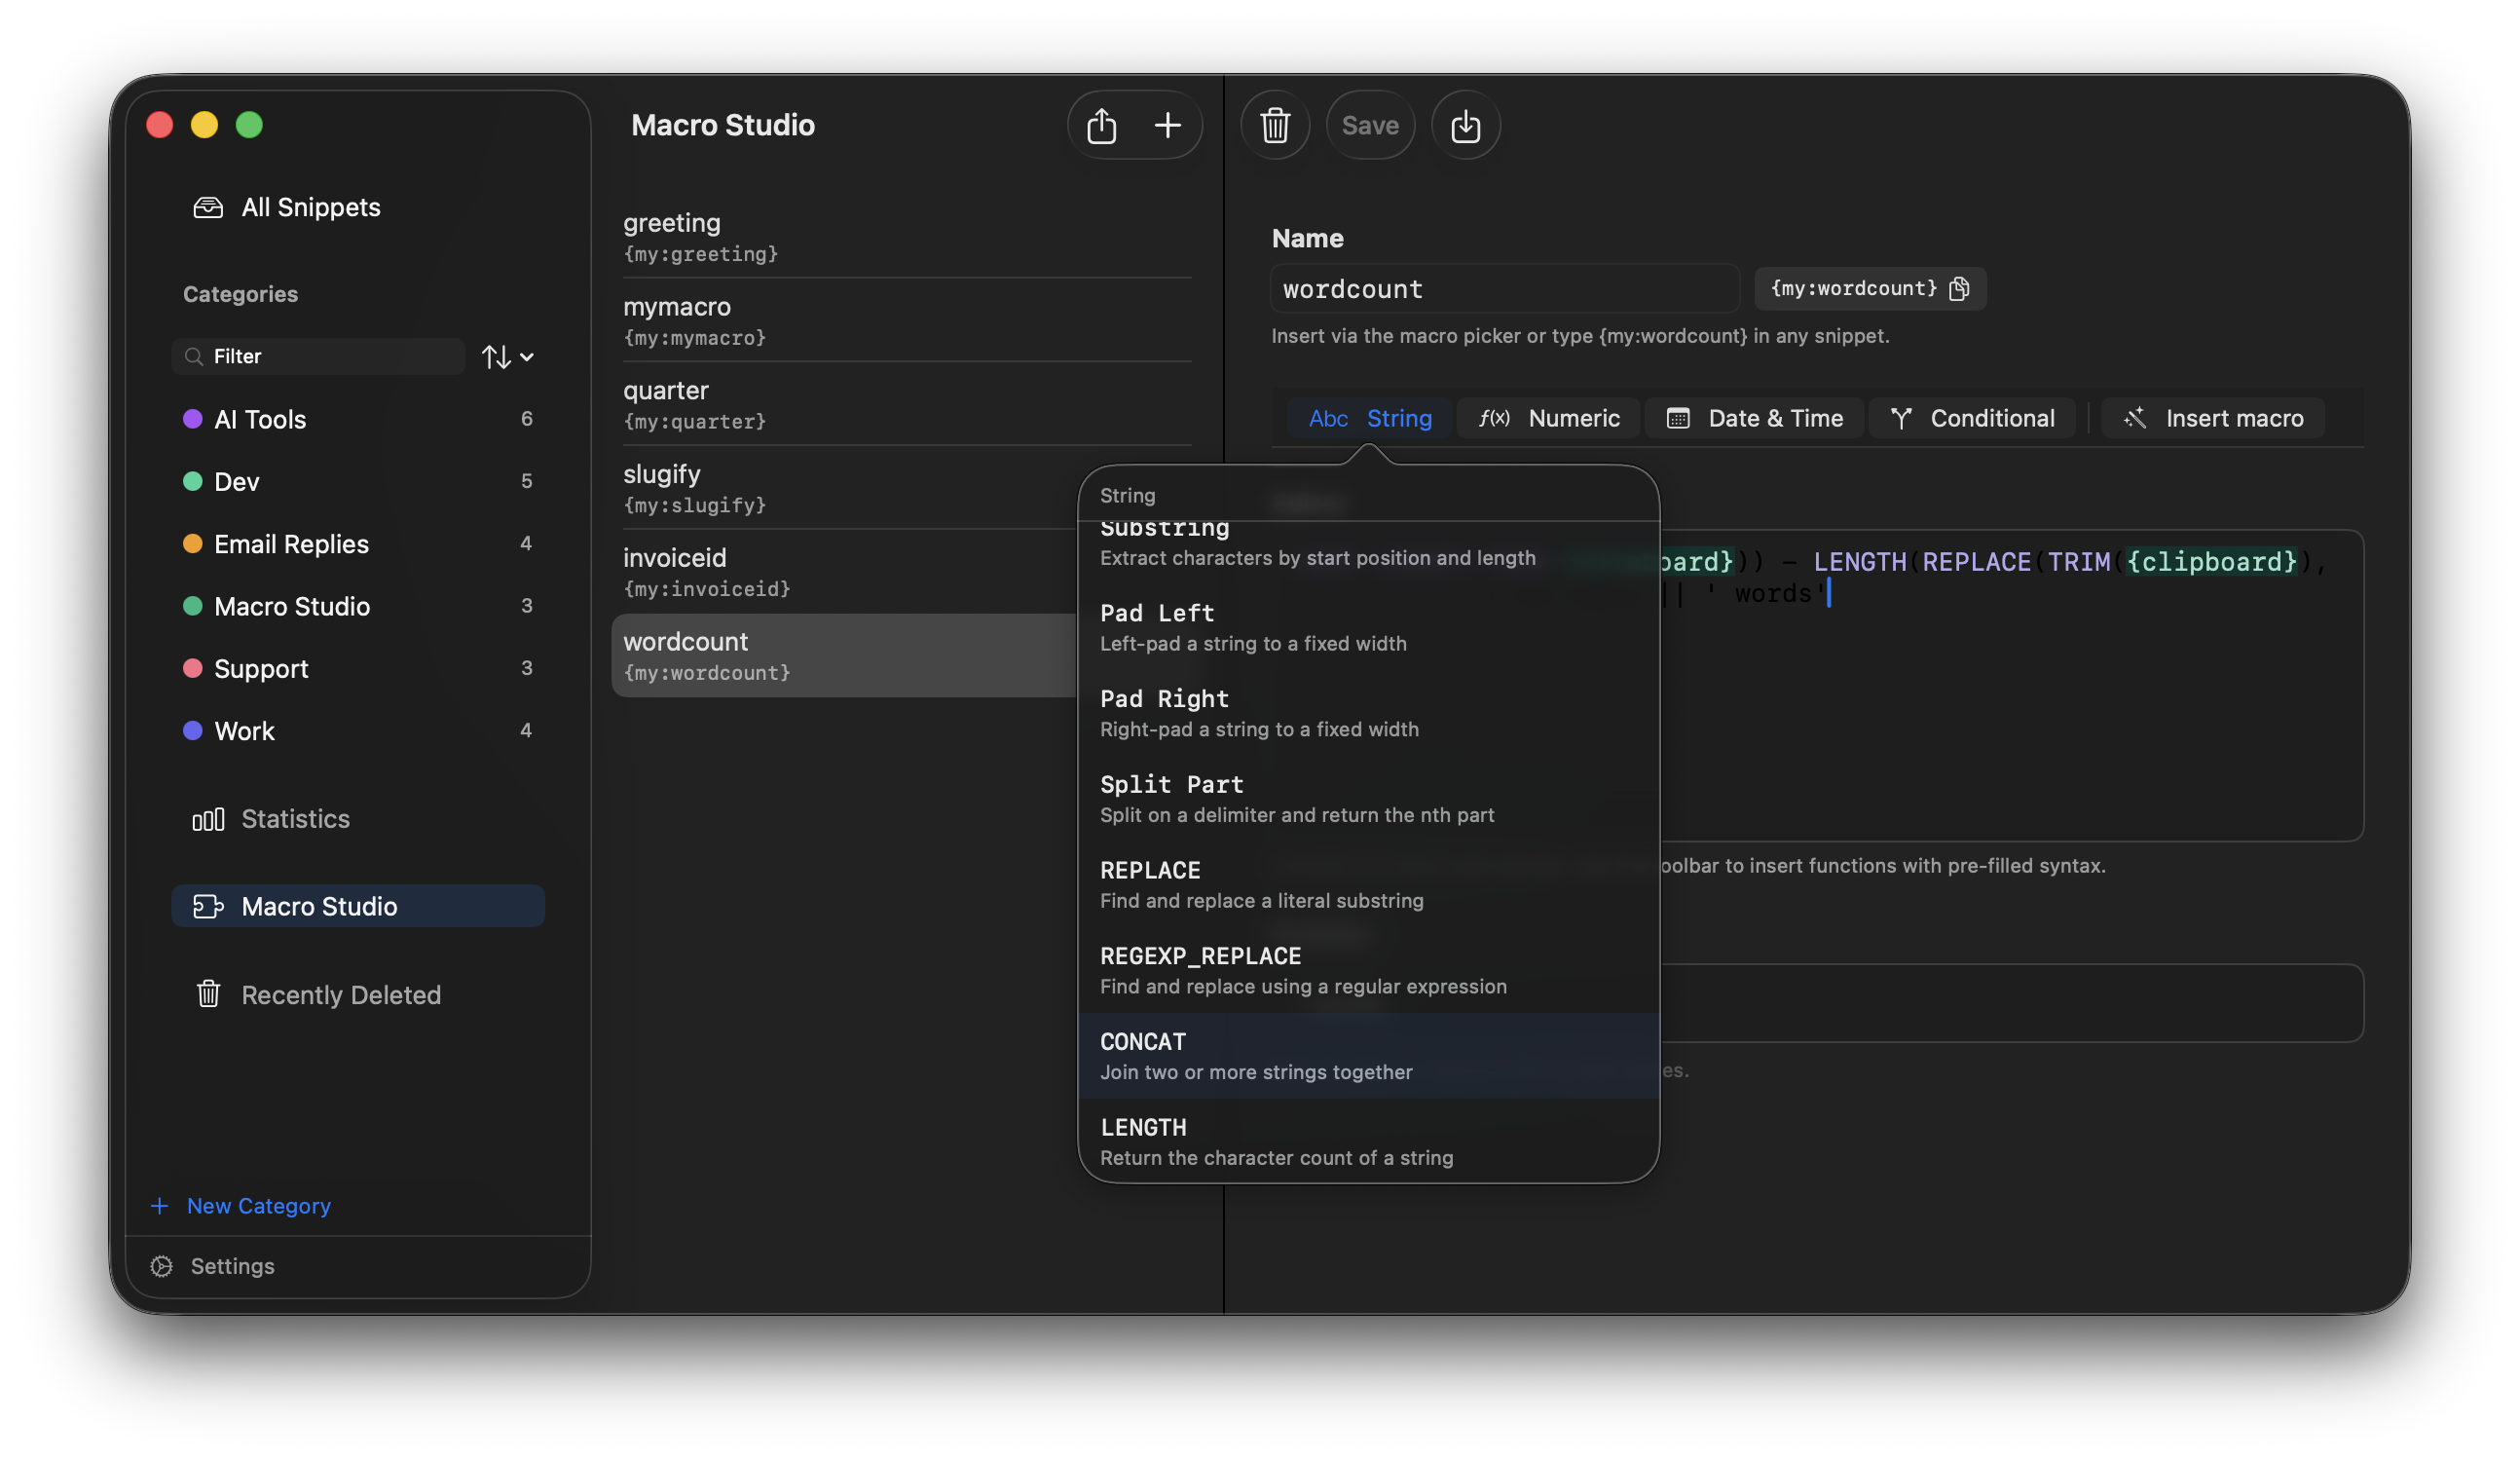
The macro editor. The token chip next to the name copies the ready-to-paste token.
Formula editor
Each macro has a formula — a SQL-like expression that can call functions, reference built-in macros, and nest results. The toolbar above the editor inserts functions with pre-filled syntax placeholders so you don't need to memorize anything.
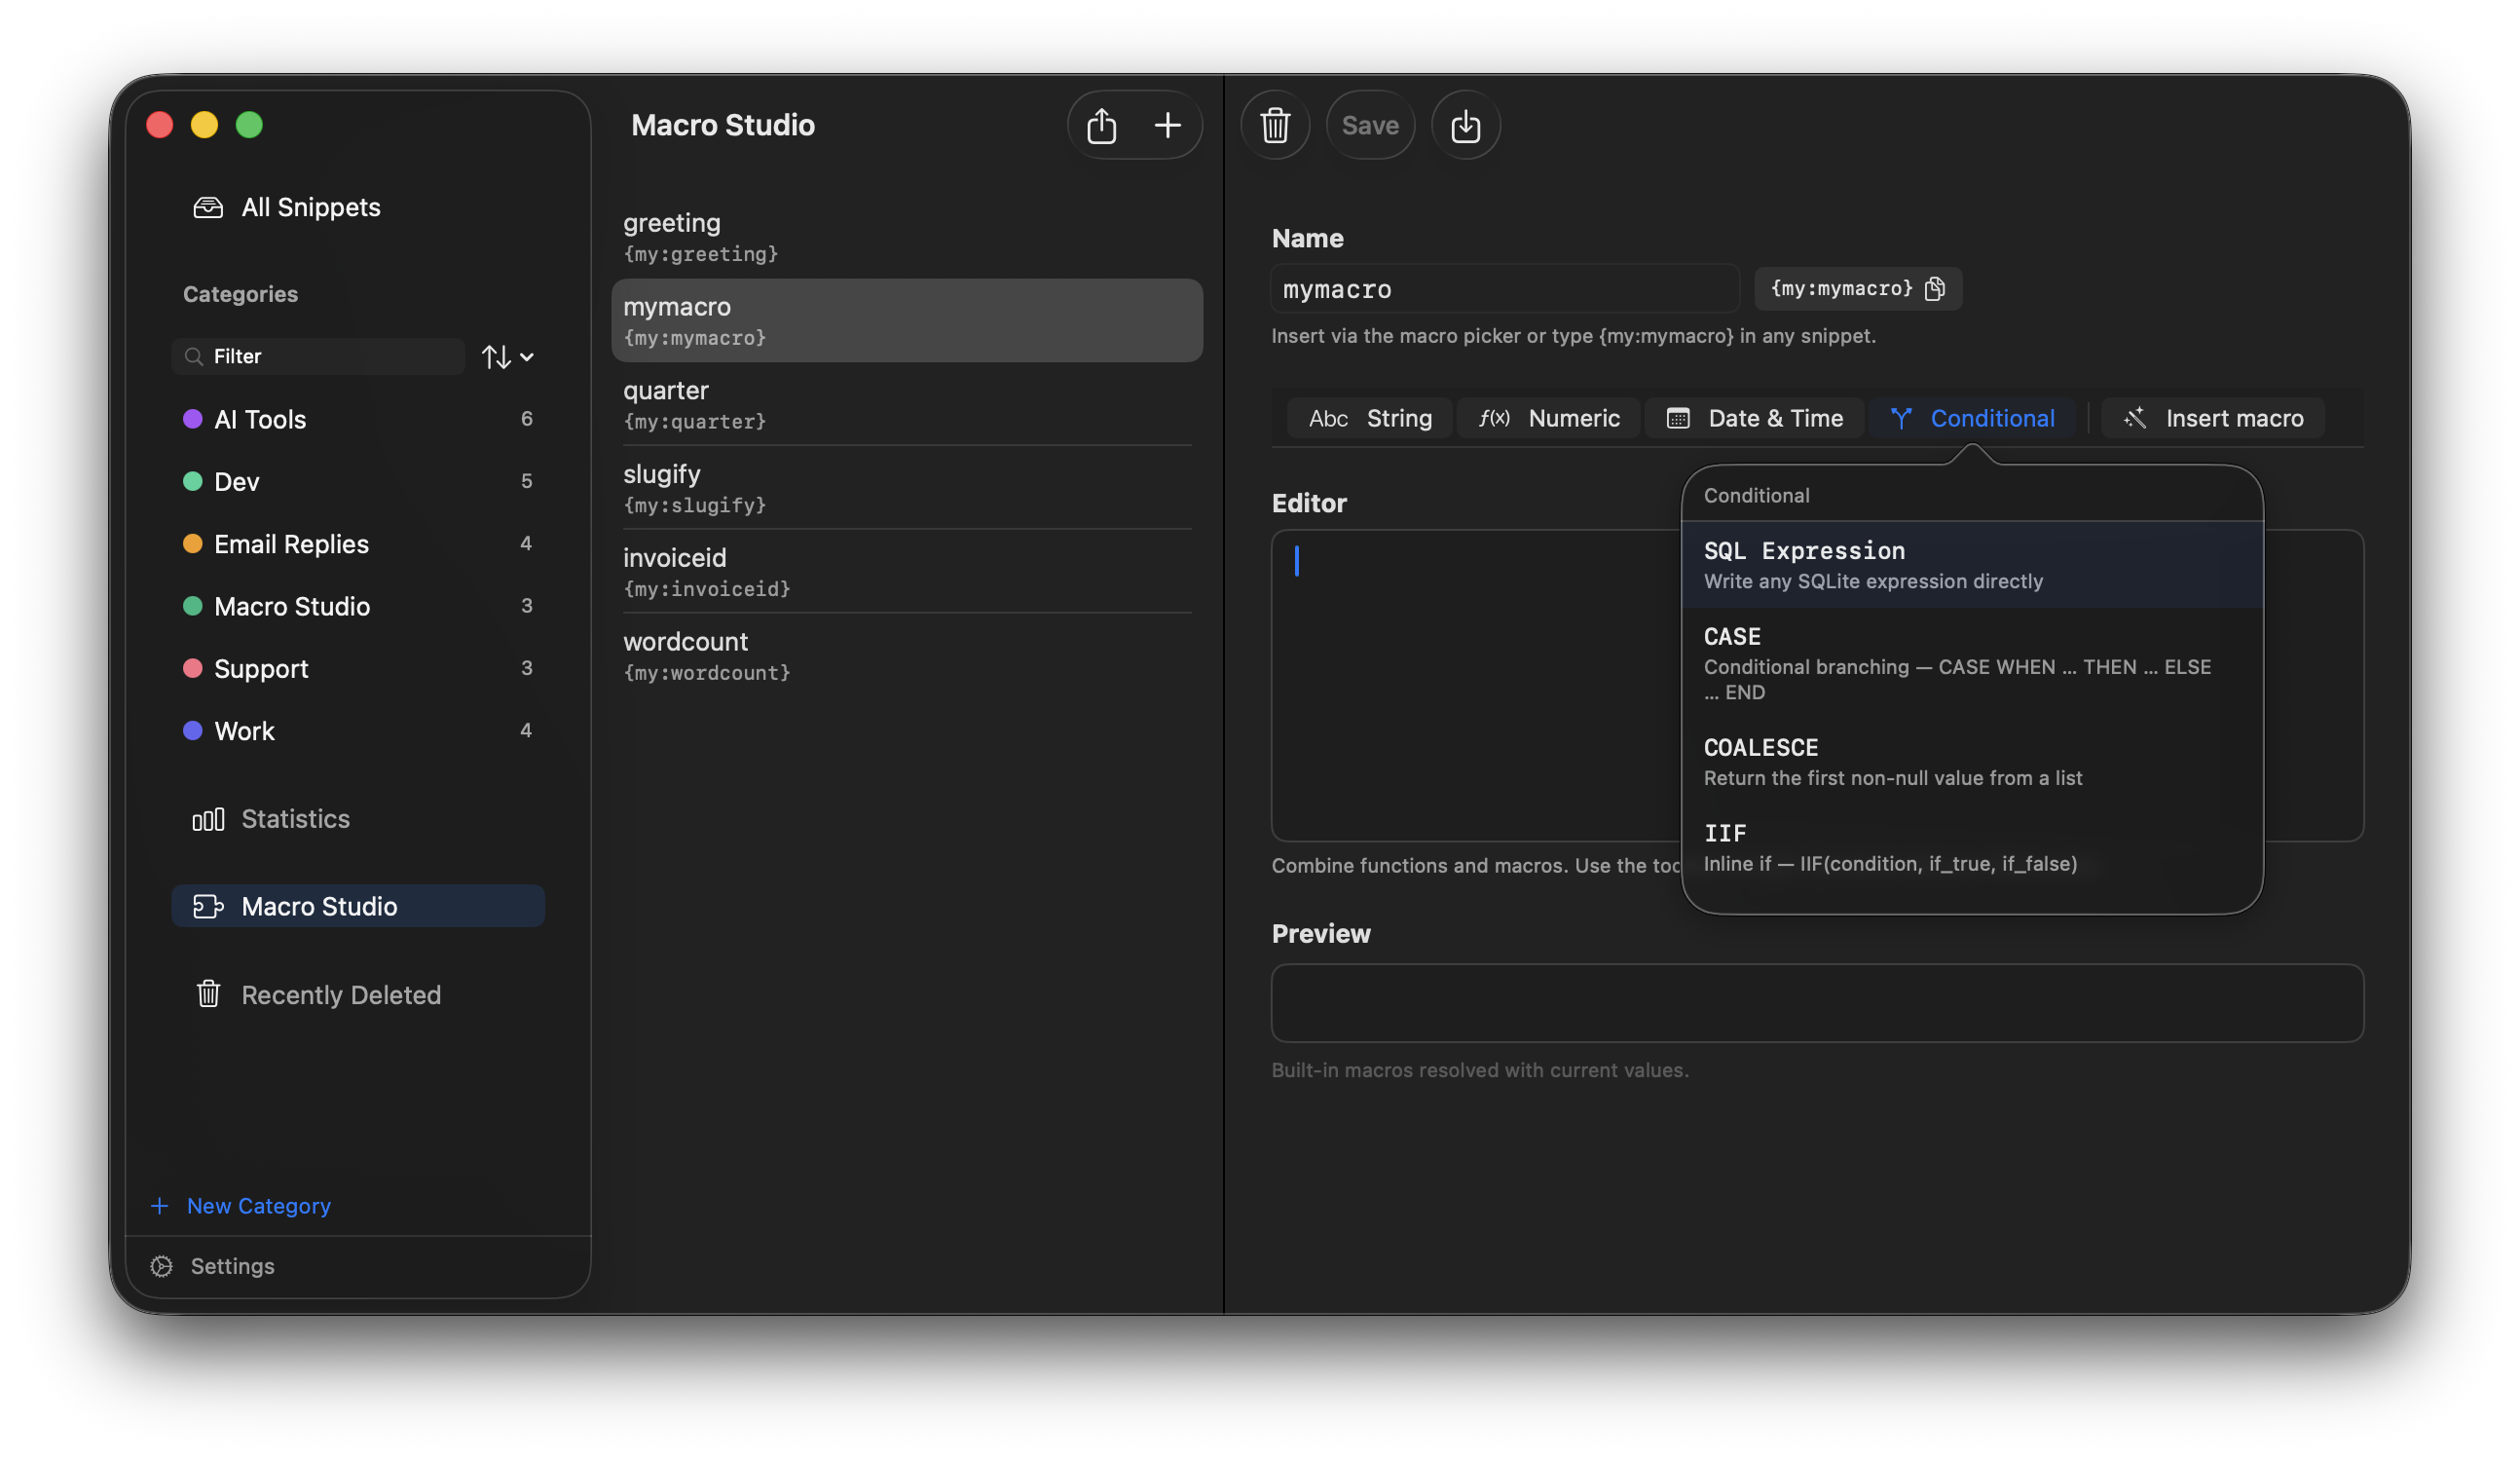
The formula toolbar. Click a category to browse and insert functions.
How formulas work
A formula is evaluated as a SQLite expression. Built-in macros are resolved to their values first, then the expression runs. The result is what gets typed when the macro fires.
You can nest functions as deeply as you like. The preview at the bottom of the editor resolves the formula with today's values in real time.
String functions
Transform text in any way — change case, trim whitespace, extract substrings, encode for URLs, and more.
| Function | What it does | Example |
|---|---|---|
UPPER(expr) | Convert to ALL CAPS | UPPER('hello') → HELLO |
LOWER(expr) | Convert to all lowercase | LOWER('Hello') → hello |
TITLE_CASE(expr) | Capitalize Each Word | TITLE_CASE('hello world') → Hello World |
SENTENCE_CASE(expr) | Capitalize only the first word | SENTENCE_CASE('hello world') → Hello world |
TRIM(expr) | Remove leading/trailing whitespace | TRIM(' hi ') → hi |
COLLAPSE_WS(expr) | Collapse runs of spaces to one | COLLAPSE_WS('a b c') → a b c |
REMOVE_NL(expr) | Replace line breaks with spaces | REMOVE_NL('a\nb') → a b |
LEFT(expr, n) | First n characters | LEFT('abcdef', 3) → abc |
RIGHT(expr, n) | Last n characters | RIGHT('abcdef', 3) → def |
SUBSTR(expr, start, len) | Substring by position and length | SUBSTR('abcdef', 2, 3) → bcd |
LENGTH(expr) | Character count | LENGTH('hello') → 5 |
CONCAT(a, b) | Join two strings | CONCAT('Hello, ', 'world') → Hello, world |
REPLACE(expr, find, with) | Replace literal text | REPLACE('a-b-c', '-', '_') → a_b_c |
REGEXP_REPLACE(expr, pattern, with) | Replace using a regex | REGEXP_REPLACE('abc123', '[0-9]+', 'NUM') → abcNUM |
SPLIT_PART(expr, delim, n) | nth segment after splitting | SPLIT_PART('a,b,c', ',', 2) → b |
PAD_LEFT(expr, width, char) | Left-pad to a fixed width | PAD_LEFT('42', 5, '0') → 00042 |
PAD_RIGHT(expr, width, char) | Right-pad to a fixed width | PAD_RIGHT('42', 5, '-') → 42--- |
URL_ENCODE(expr) | Percent-encode for URLs | URL_ENCODE('hello world') → hello%20world |
URL_DECODE(expr) | Decode a percent-encoded string | URL_DECODE('hello%20world') → hello world |
Numeric functions
Perform math on numbers. Numeric results can be fed back into string functions — they're all just values in an expression.
| Function | What it does | Example |
|---|---|---|
ABS(expr) | Absolute value | ABS(-42) → 42 |
ROUND(expr, n) | Round to n decimal places | ROUND(3.14159, 2) → 3.14 |
CEIL(expr) | Round up to nearest integer | CEIL(3.1) → 4 |
FLOOR(expr) | Round down to nearest integer | FLOOR(3.9) → 3 |
TRUNC(expr) | Drop decimals without rounding | TRUNC(3.9) → 3 |
SQRT(expr) | Square root | SQRT(9) → 3 |
POWER(expr, exp) | Raise to an exponent | POWER(2, 8) → 256 |
EXP(expr) | e raised to the power | ROUND(EXP(1), 4) → 2.7183 |
LOG(base, expr) | Logarithm | LOG(10, 1000) → 3 |
Date & Time functions
Work with dates and times. Date strings should be in YYYY-MM-DD format unless otherwise noted. Pass {date} or {date:yyyy-MM-dd} to supply today's date.
| Function | What it does | Example |
|---|---|---|
CURRENT_DATE | Today's date (YYYY-MM-DD) | CURRENT_DATE → 2026-06-12 |
NOW() | Current date and time | NOW() → 2026-06-12T10:30:00Z |
DATE_FORMAT(expr, fmt) | Reformat a date string | DATE_FORMAT({date:yyyy-MM-dd}, 'MMMM d, yyyy') → June 12, 2026 |
DATE_ADD(expr, n, unit) | Add days/months/years to a date | DATE_ADD({date:yyyy-MM-dd}, 30, 'day') → date 30 days from today |
DATEDIFF(a, b, unit) | Days/months/years between two dates | DATEDIFF('2026-01-01', {date:yyyy-MM-dd}, 'day') |
MONTHS_BETWEEN(a, b) | Months between two dates | MONTHS_BETWEEN('2026-01-01', '2026-06-01') → 5 |
DATE_TRUNC(expr, unit) | Truncate to year/quarter/month | DATE_TRUNC('2026-06-15', 'month') → 2026-06-01 |
TO_UNIX_TIMESTAMP(expr) | Convert to Unix epoch seconds | TO_UNIX_TIMESTAMP('2026-01-01') → 1767225600 |
YEAR(expr) | Extract year | YEAR('2026-06-12') → 2026 |
QUARTER(expr) | Quarter number (1–4) | QUARTER('2026-06-12') → 2 |
MONTH(expr) | Month number (1–12) | MONTH('2026-06-12') → 6 |
WEEKOFYEAR(expr) | Week of the year (1–53) | WEEKOFYEAR('2026-01-05') → 1 |
DAY(expr) | Day of month (1–31) | DAY('2026-06-12') → 12 |
HOUR(expr) | Hour (0–23) | HOUR('2026-06-12 14:30:00') → 14 |
MINUTE(expr) | Minute (0–59) | MINUTE('2026-06-12 14:30:00') → 30 |
SECOND(expr) | Second (0–59) | SECOND('2026-06-12 14:30:00') → 0 |
Conditional functions
Branch on conditions. Useful for dynamic snippets that change based on context.
| Function | What it does | Example |
|---|---|---|
IIF(cond, a, b) | Inline if — returns a if condition is true, else b | IIF(LENGTH({clipboard}) > 0, UPPER({clipboard}), 'empty') |
COALESCE(a, b, …) | Return the first non-null value | COALESCE({fill:Name}, 'Friend') |
CASE … END |
Multi-branch conditional |
CASE MONTH({date:yyyy-MM-dd})
  WHEN 1 THEN 'Q1'
  WHEN 4 THEN 'Q2'
  WHEN 7 THEN 'Q3'
  ELSE 'Q4'
END
|
Real-world examples
Clean up clipboard and UPPERCASE it:
UPPER(TRIM(COLLAPSE_WS({clipboard})))Dynamic greeting based on time of day:
IIF(CAST(HOUR(NOW()) AS INTEGER) < 12, 'Good morning', IIF(CAST(HOUR(NOW()) AS INTEGER) < 17, 'Good afternoon', 'Good evening'))Days until end of year:
DATEDIFF({date:yyyy-MM-dd}, CAST(YEAR({date:yyyy-MM-dd}) AS TEXT) || '-12-31', 'day')Pad an invoice number to 6 digits:
PAD_LEFT({fill:Invoice #}, 6, '0')Current quarter label:
'Q' || QUARTER({date:yyyy-MM-dd}) || ' ' || YEAR({date:yyyy-MM-dd}){ai:…}, the preview shows a placeholder by default. Click Test AI macro to run a live preview that calls the API — you'll see a confirmation before any credits are used.Using Your Macros
Custom macros appear in a My Macros section at the top of the macro picker in the snippet editor. Click one to insert its token — or just type it directly:
-- Snippet: "Email closer"  abbreviation: !close --
Let me know if you have any questions.

{my:sigblock}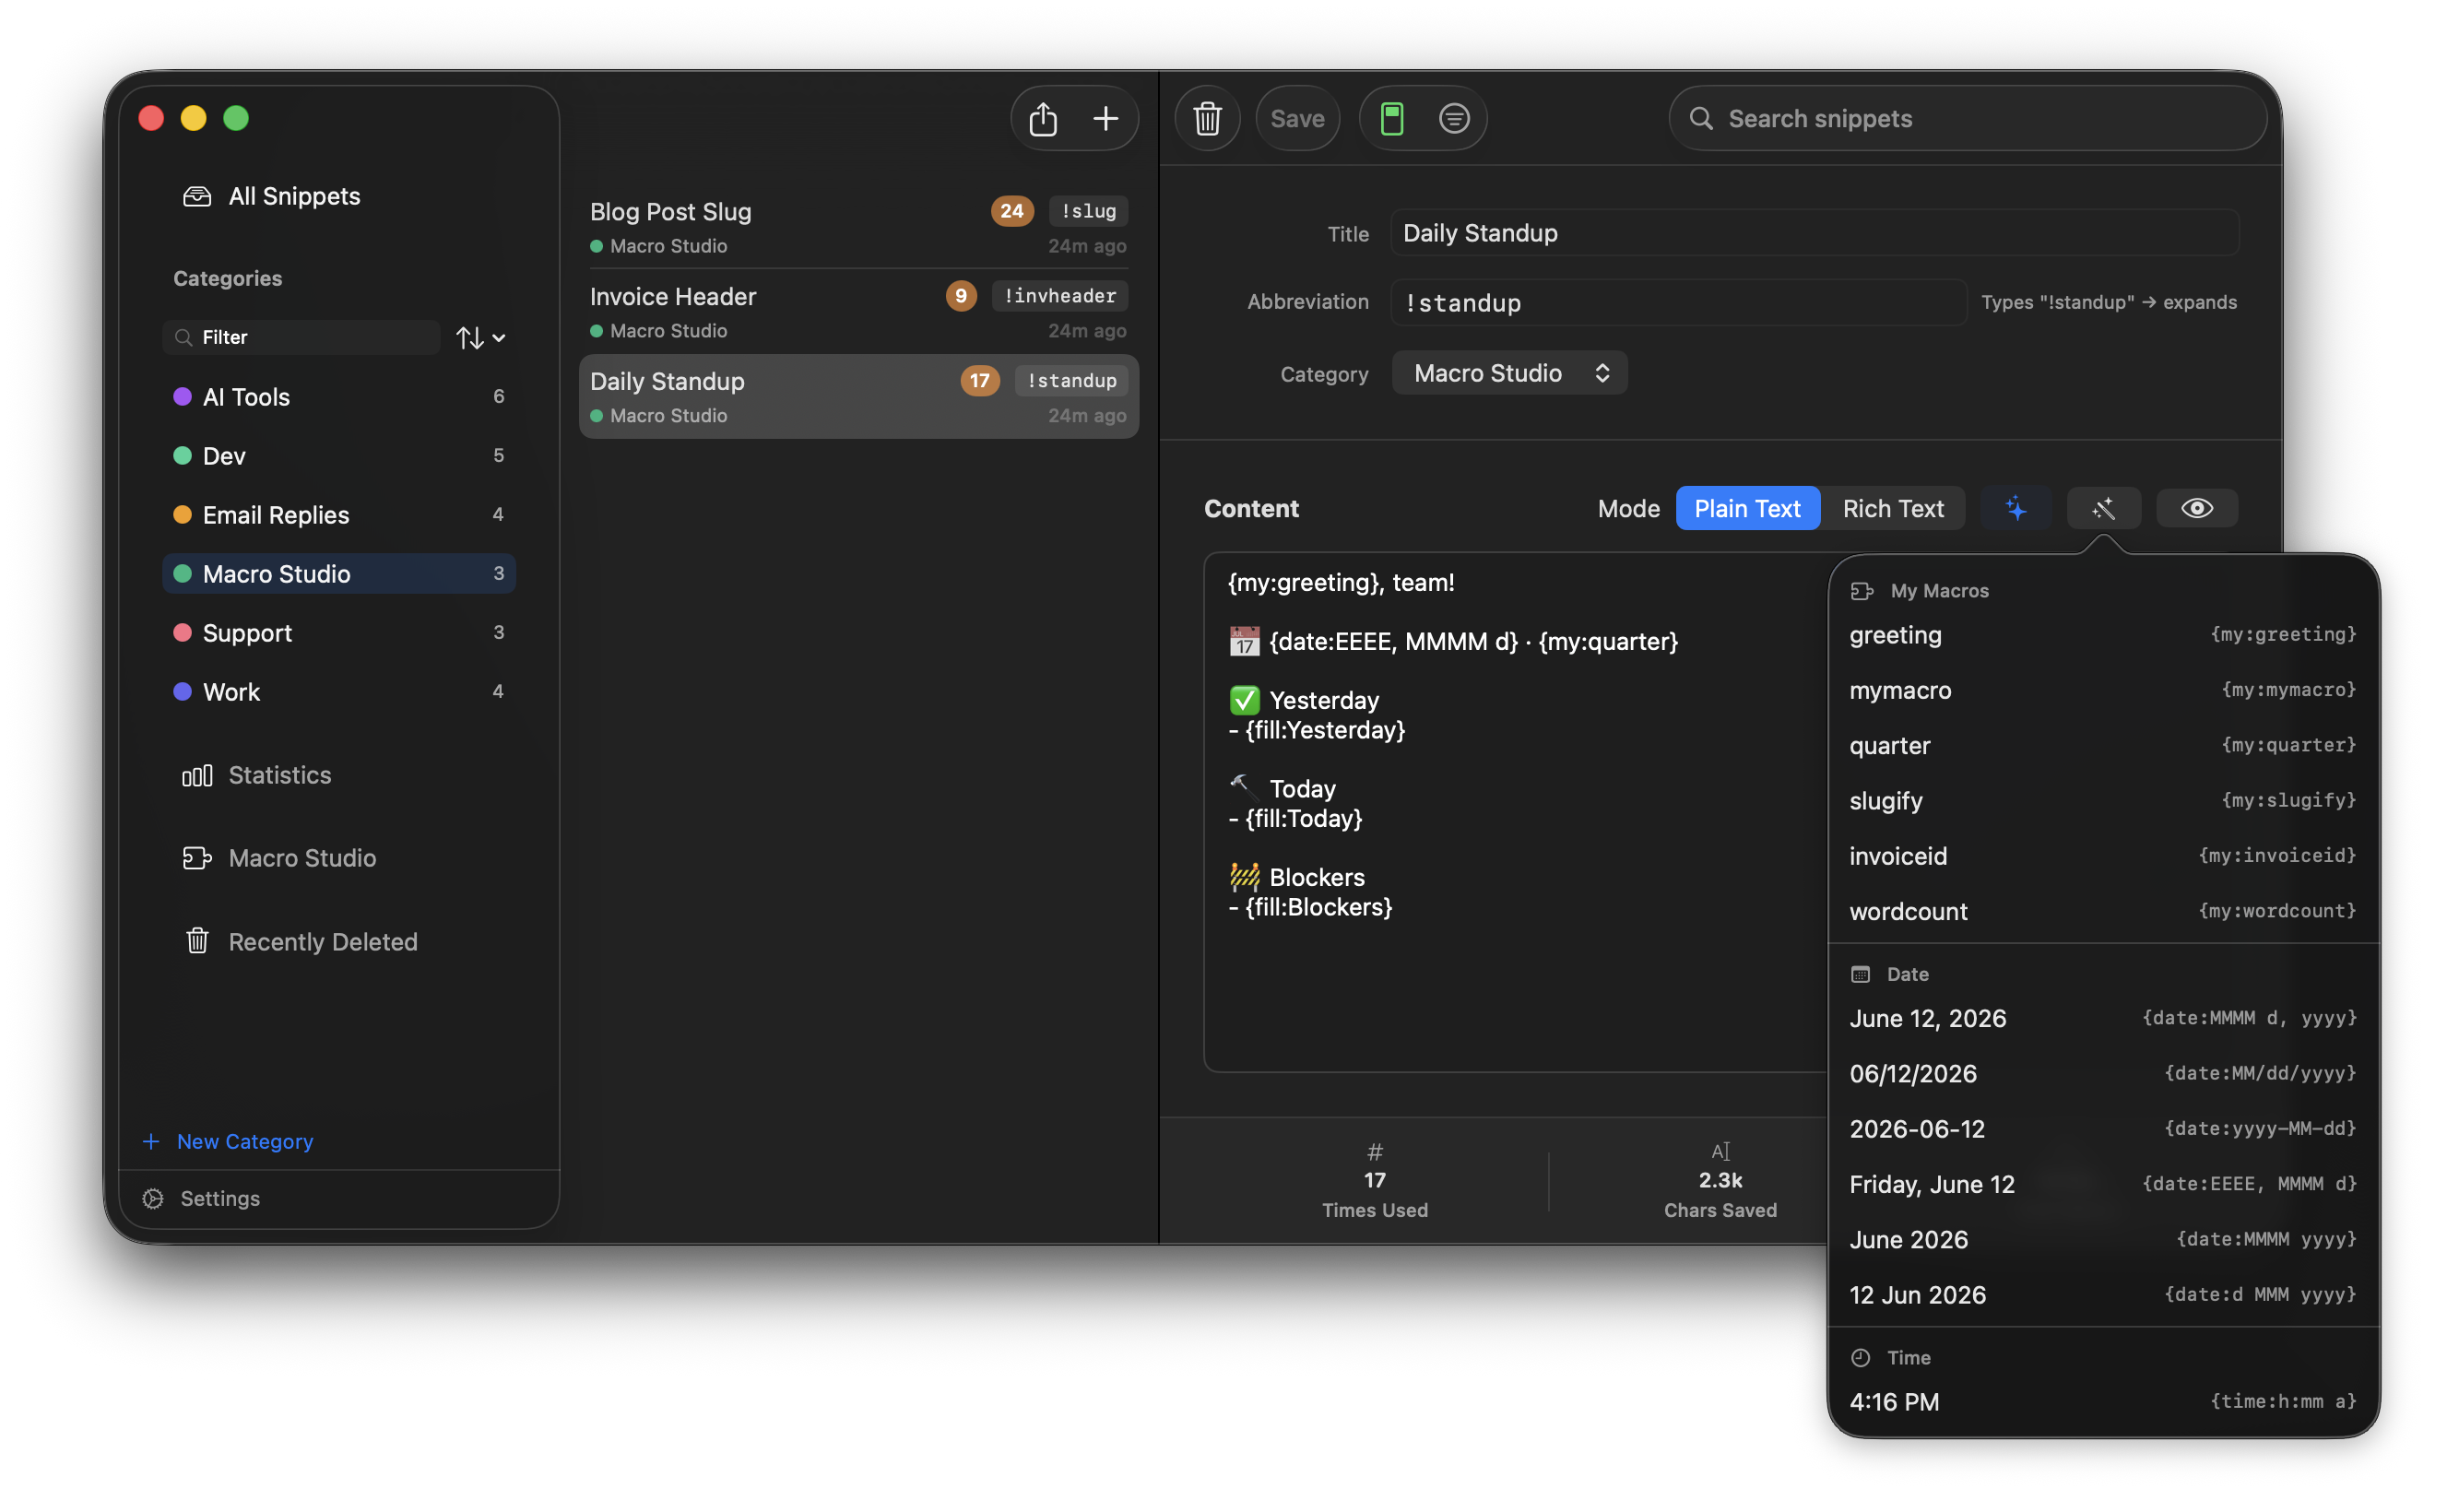
The macro picker with your custom macros listed at the top.
Custom macros work in plain and rich text snippets, and fill-in fields inside them prompt you exactly like fill-ins typed directly in the snippet. If a snippet references a macro you've deleted (or Macro Studio is turned off), the token is left as typed rather than expanding — nothing is lost.
Macro Prefix
All custom macro tokens share a prefix — my by default, so tokens look like {my:sigblock}. You can change it under Settings → General → Macro Studio to anything from 1 to 12 letters, as long as it doesn't collide with a built-in macro name (date, time, clipboard, cursor, fill, snippet, shortcut, ai).
AI Macros
AI Macros let you embed an AI prompt directly inside a snippet. When the snippet fires, TypeShift sends your prompt to an AI provider and types the response in place — no copy-pasting, no switching apps.
Overview
The AI macro token is {ai: your prompt here}. Write whatever prompt you'd give the AI, and the result is what gets expanded. Combine it with other macros to make prompts dynamic — pass in clipboard text, fill-in values, or today's date.
-- Type "!fix" anywhere to fix grammar in your clipboard --
{ai: Fix any grammar and spelling errors in the following text, return only the corrected text: {clipboard}}Supported Providers
TypeShift supports four AI providers. All require an account with the provider; most charge per use (fractions of a cent per expansion).
OpenAI
GPT-4o, GPT-4o mini, and all current OpenAI models.
Anthropic
Claude 3.5 Sonnet, Claude 3 Haiku, Opus, and newer Claude models. Enterprise/gateway support included.
xAI (Grok)
Grok 3 and Grok 3 mini from xAI.
Ollama
Run any open-source model locally. No API key, no internet, no cost per use.
API Key Setup
Open Settings → AI Macros to configure your provider and API key.
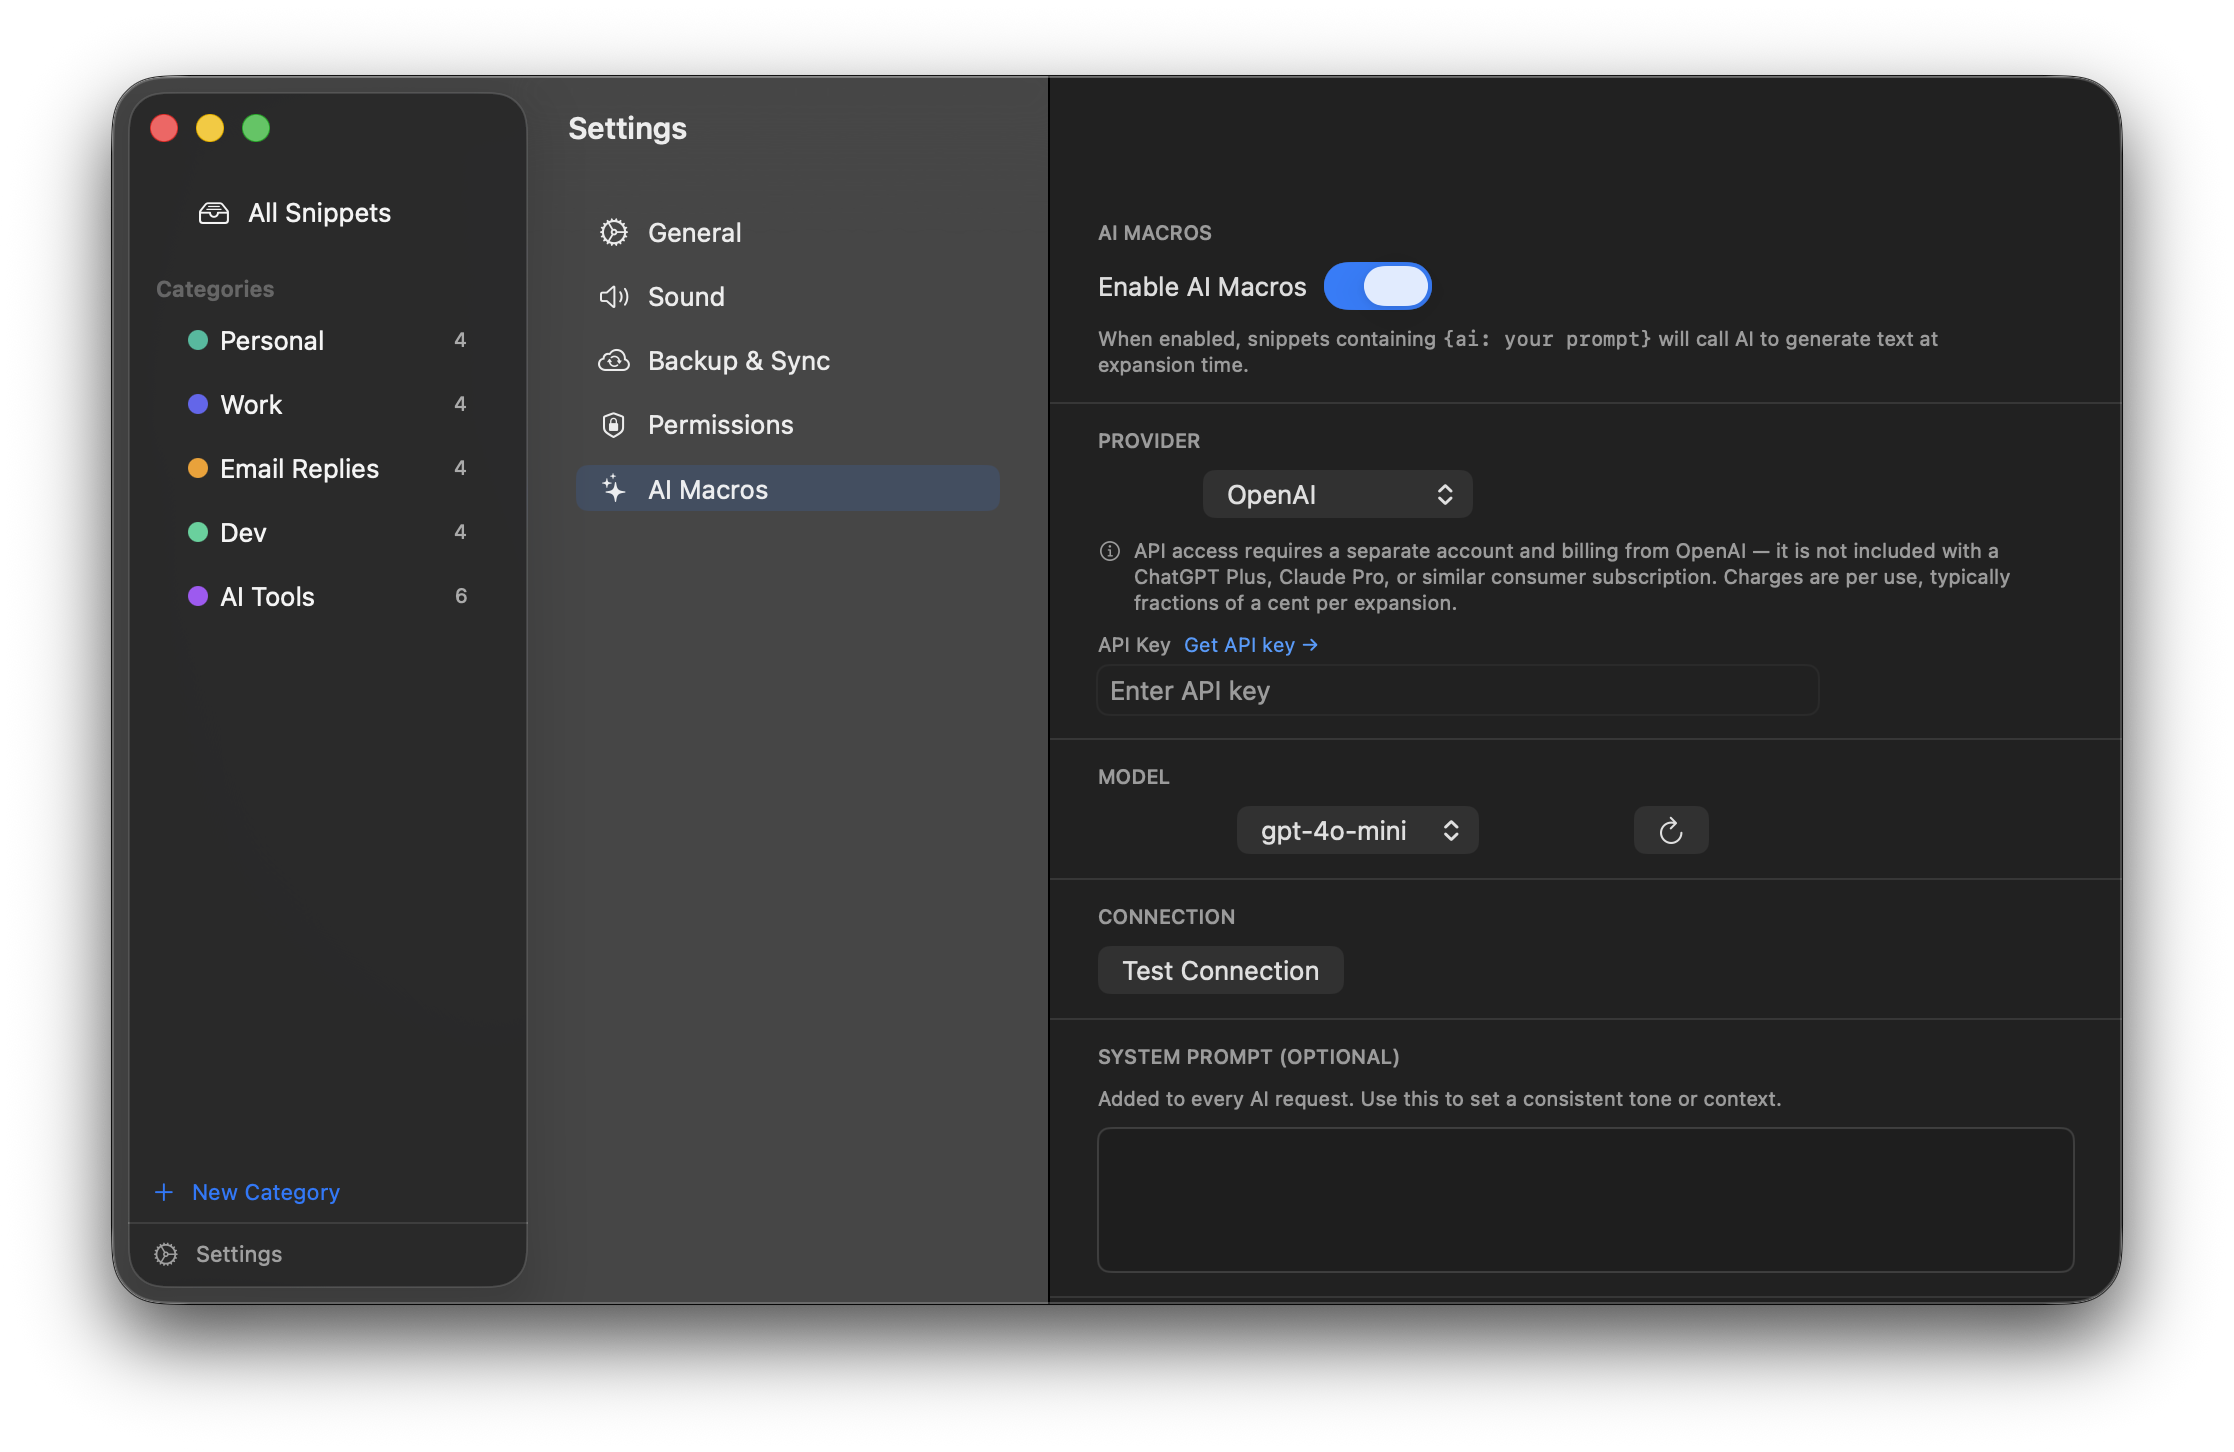
Settings → AI Macros. Select a provider, paste your API key, then click Test Connection.
OpenAI
- 1Go to platform.openai.com/api-keys and create a new secret key.
- 2Select OpenAI in the Provider picker and paste the key into the API Key field.
- 3TypeShift fetches the available model list automatically. Choose a model from the picker, then click Test Connection.
Anthropic
- 1Go to console.anthropic.com/settings/keys and create an API key.
- 2Select Anthropic and paste the key. TypeShift will list available Claude models.
- 3Click Test Connection to verify.
xAI (Grok)
- 1Go to console.x.ai and generate an API key.
- 2Select xAI (Grok), paste the key, choose your model, and test.
Ollama (local)
- 1Download and install Ollama, then pull a model:
ollama pull llama3 - 2Make sure the Ollama app is running (it shows a status icon in your menu bar).
- 3Select Ollama in TypeShift. No API key needed — TypeShift auto-detects running models.
Writing AI Prompts
The {ai: …} token accepts any text as the prompt. Write it exactly as you would write a prompt in ChatGPT or Claude — the clearer and more specific you are, the better the output.
Practical examples
| Snippet content | What it does |
|---|---|
{ai: Write a polite out-of-office reply. Keep it under 3 sentences.} |
Generates a fresh out-of-office message each time |
{ai: Rewrite the following in a professional tone: {clipboard}} |
Rewrites whatever you've copied into a more formal register |
{ai: Translate this to Spanish: {clipboard}} |
Translates clipboard text to Spanish on demand |
{ai: Summarize the following in one sentence: {clipboard}} |
One-sentence summary of copied text |
{ai: Write a LinkedIn connection request to {fill:Name} who works at {fill:Company}.} |
Generates a personalized connection note after asking for name and company |
Getting consistent output
A few techniques that help:
- Be explicit about format: "Return only the corrected text, no explanation." prevents the AI from adding commentary.
- Specify length: "Keep it under 2 sentences" or "Write exactly 3 bullet points."
- Specify tone: "Professional", "casual", "concise", "friendly but brief."
- Use a System Prompt for constraints that apply to all your AI macros — see below.
Embedding Macros in AI Prompts
Any macro token can be placed inside an {ai: …} prompt — TypeShift resolves all inner tokens before sending the prompt to the AI.
-- Rewrite clipboard text --
{ai: Rewrite the following in a professional tone: {clipboard}}

-- Use a fill-in to target the audience --
{ai: Rewrite this for a {fill:Audience} audience: {clipboard}}

-- Include today's date in the context --
{ai: Write a status update for {date:EEEE MMMM d}. Key update: {fill:Update}}
The order of resolution is: fill-in fields first (TypeShift collects all values from the user), then {clipboard}, {date}, and other tokens — then the fully-resolved prompt is sent to the AI.
{ai: … {clipboard}}. Copy any text — an email, a document excerpt, a URL — then fire a snippet that processes it with AI. Grammar fixing, translation, summarization, tone adjustment, and reformatting all work this way.System Prompt
The system prompt is a set of standing instructions prepended to every AI request you make. Use it to give the AI consistent context about who you are and how you want it to behave across all your AI macros.
Find it in Settings → AI Macros → System Prompt. Some useful starting points:
-- Example system prompt --
You are a writing assistant for a software engineer at a B2B SaaS company.
Keep responses concise and professional. Return only the requested output
— no explanations, caveats, or preamble unless explicitly asked.
The system prompt applies to all providers and all AI macro snippets. Leave it blank if you don't need global context — individual snippet prompts can be self-contained.
Advanced Settings
Expand the Advanced section in Settings → AI Macros to access:
| Setting | What it does | Default |
|---|---|---|
| Temperature | Controls randomness. Lower values (0.0–0.5) give more predictable, consistent output. Higher values (0.8–2.0) give more varied, creative output. | 0.7 |
| Max Tokens | Maximum length of the AI's response. Increase for longer outputs like full emails or summaries of long documents. Decrease to force brevity. | 1024 |
| Custom Model ID (Anthropic) | Override the model picker with any model ID — useful for newly released models not yet in the standard list. | — |
Enterprise & Gateway
If your organization routes AI requests through a corporate gateway — such as an AWS Bedrock deployment, an Azure OpenAI endpoint, or a custom proxy — you can configure TypeShift to send requests there instead of directly to the provider's public API.
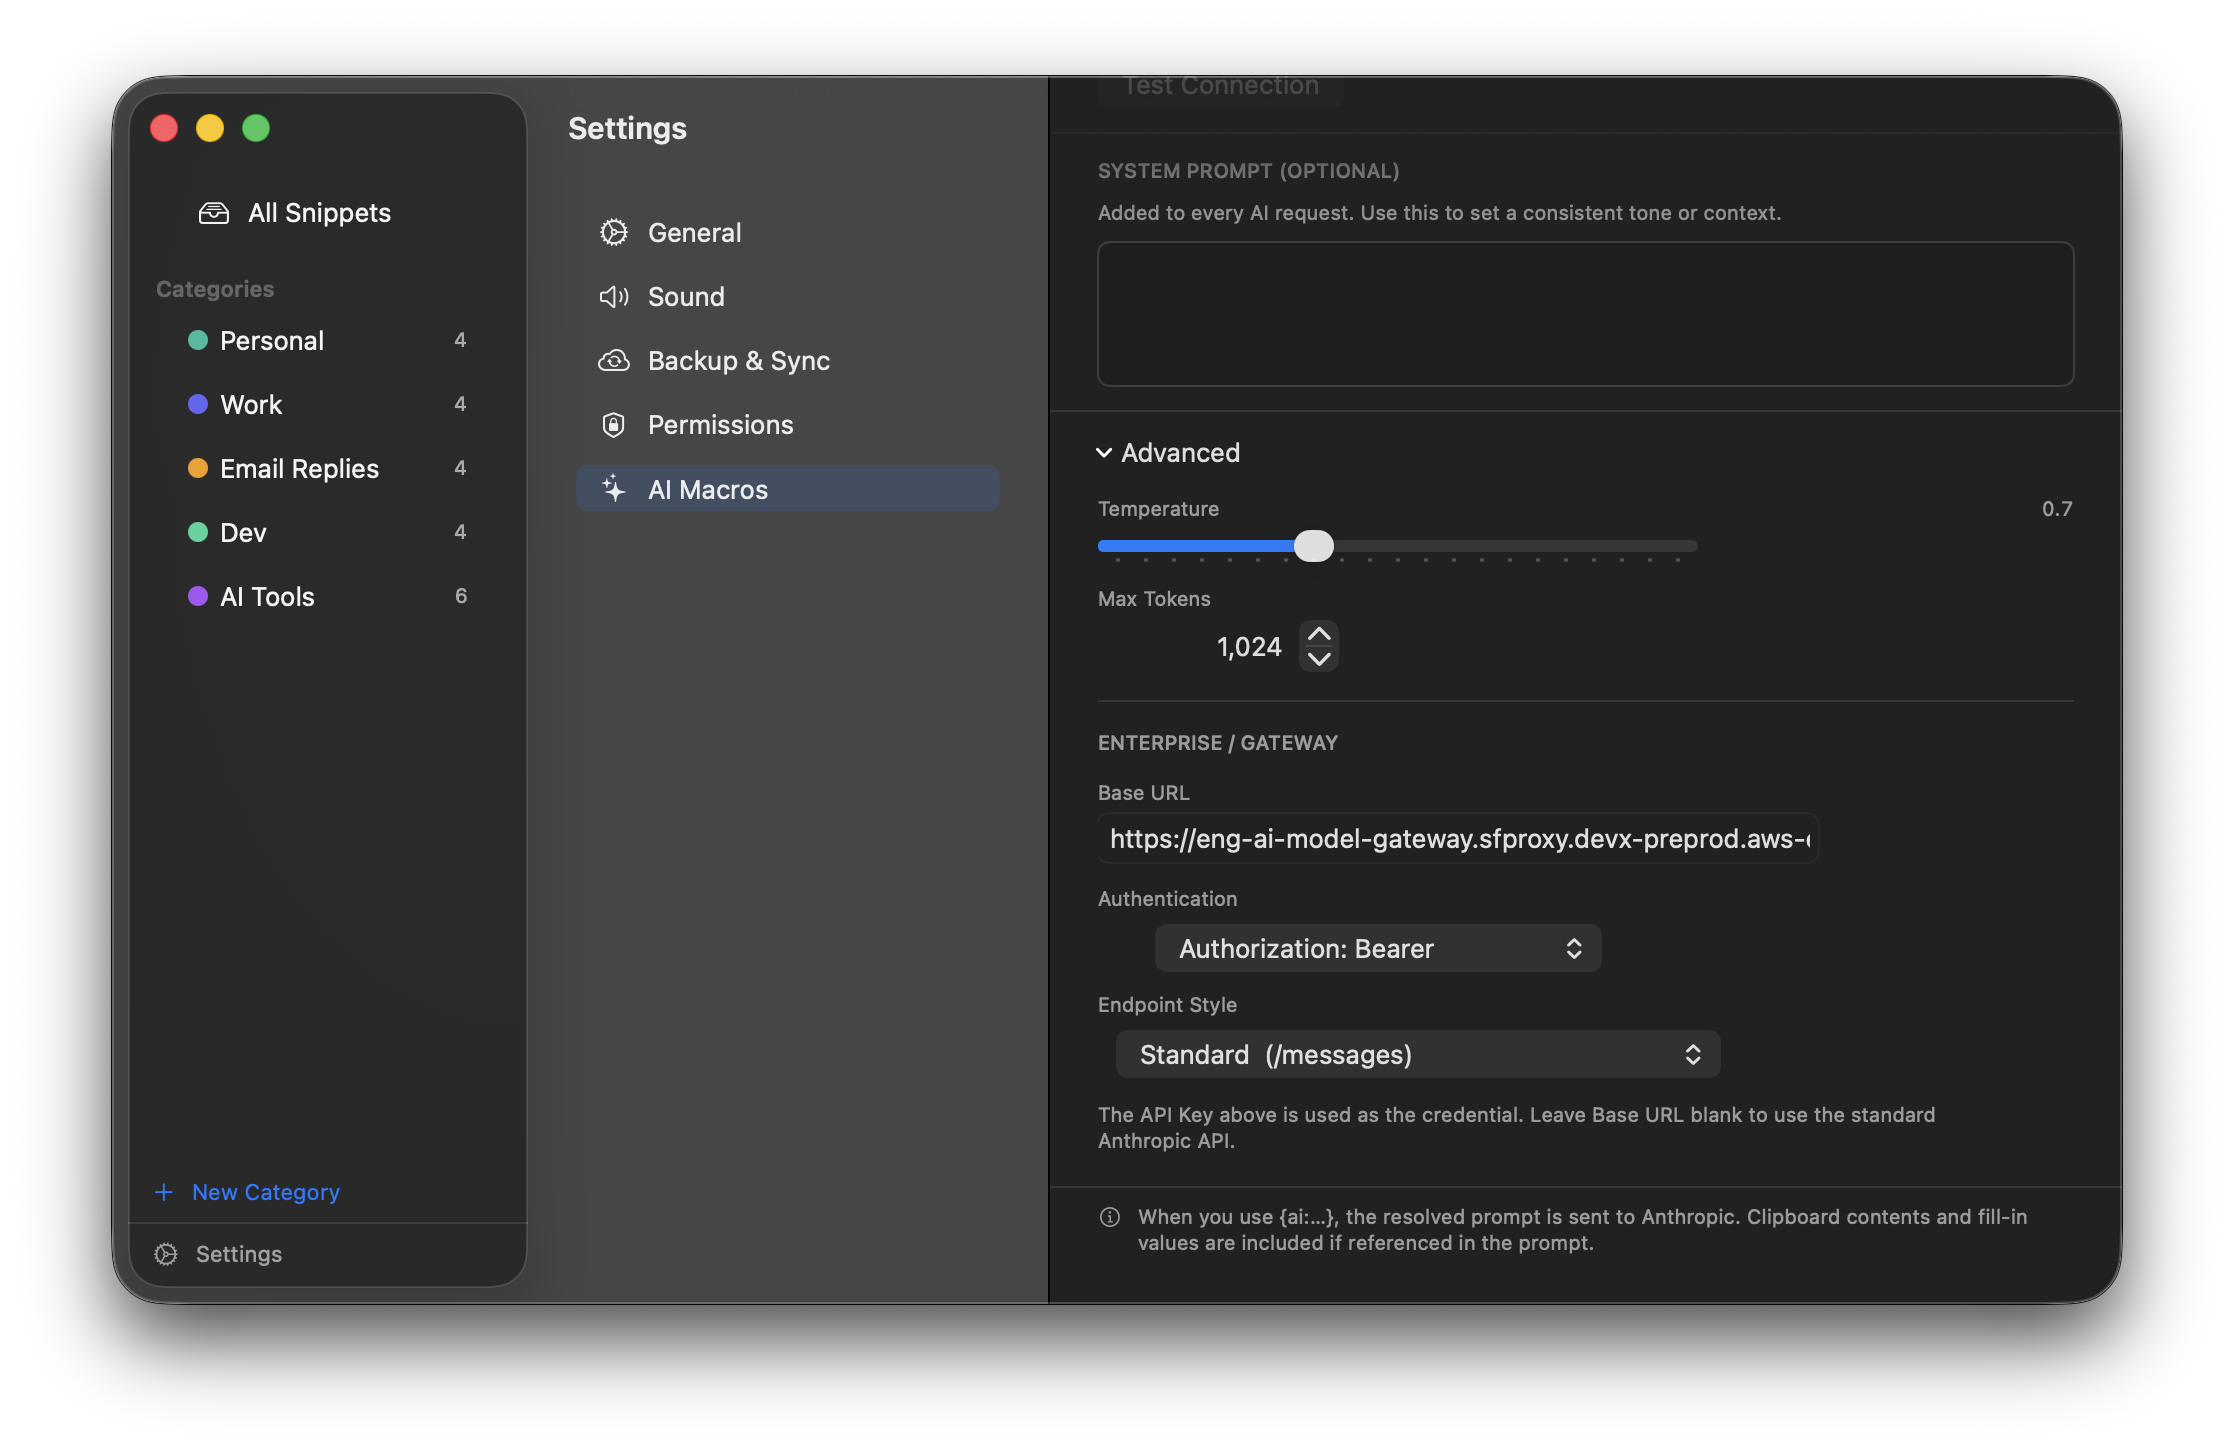
Enterprise settings appear in Advanced once you enter a Base URL.
Base URL
Enter your gateway's base URL — everything up to but not including the path. For example:
https://your-gateway.corp.example.com/bedrockLeave this blank to use the standard Anthropic API (https://api.anthropic.com).
Authentication
Choose how TypeShift sends the API key to your gateway:
| Option | Header sent | When to use |
|---|---|---|
| x-api-key | x-api-key: <key> | Standard Anthropic API and most gateways. The default. |
| Bearer token | Authorization: Bearer <key> | OAuth-style gateways and many Azure deployments. |
| Custom header | <your header>: <key> | Gateways that require a specific non-standard header name. Enter the header name in the field that appears. |
Endpoint Style
Controls what URL path TypeShift constructs for the request. Choose based on what your gateway expects:
| Style | URL constructed | Body format |
|---|---|---|
| Standard | {base}/v1/messages |
Standard Anthropic Messages API. Model name in the body. |
| Bedrock path | {base}/model/{model}/messages |
Model name in the URL path, not the body. anthropic_version: bedrock-2023-05-31 in the body. |
| Bedrock invoke | {base}/model/{model}/invoke |
Native AWS Bedrock invoke format. Model in URL, anthropic_version in body. |
| Custom path | {base}{your path} |
Enter any path. Use {model} as a placeholder where the model ID should be inserted. |
AWS Bedrock example
A typical configuration for a Salesforce or similar AWS Bedrock gateway:
Base URL:     https://your-gateway.corp.example.com/bedrock
Auth:          x-api-key  (or Bearer, depending on your setup)
Endpoint:      Bedrock invoke
Model ID:      us.anthropic.claude-opus-4-6-v1
Custom path example
For gateways with a non-standard path structure, use Custom path with the {model} placeholder:
Base URL:     https://your-gateway.corp.example.com
Auth:          Bearer token
Endpoint:      Custom path
Path:          /api/v2/models/{model}/chat
TypeShift will construct the final URL as https://your-gateway.corp.example.com/api/v2/models/us.anthropic.claude-opus-4-6-v1/chat.
Statistics
TypeShift tracks how often each snippet fires and estimates how much time you've saved. The Statistics dashboard gives you a full picture — global totals, per-snippet detail, weekly trends, and a list of snippets you've never used.
Overview
When Statistics is enabled, a Statistics row appears in the sidebar below your categories. Click it to open the Statistics dashboard alongside your snippet list.
The Statistics view uses the same split-panel layout as the rest of the app:
- Middle column — KPI bar showing library-wide totals (Expansions, Time Saved, Chars Saved, Used/Total), a category filter chip row, an All / Never Used toggle, and a ranked snippet list. Each used snippet shows its expansion count and a 12-week sparkline.
- Detail panel — when nothing is selected, shows a 12-week area chart of global activity and a relative-usage bar chart for your top snippets. Click any snippet in the list to see its individual detail: four KPI tiles (Times Used, % of Total, Time Saved, Chars Saved), a 12-week bar chart, and rank among all used snippets.
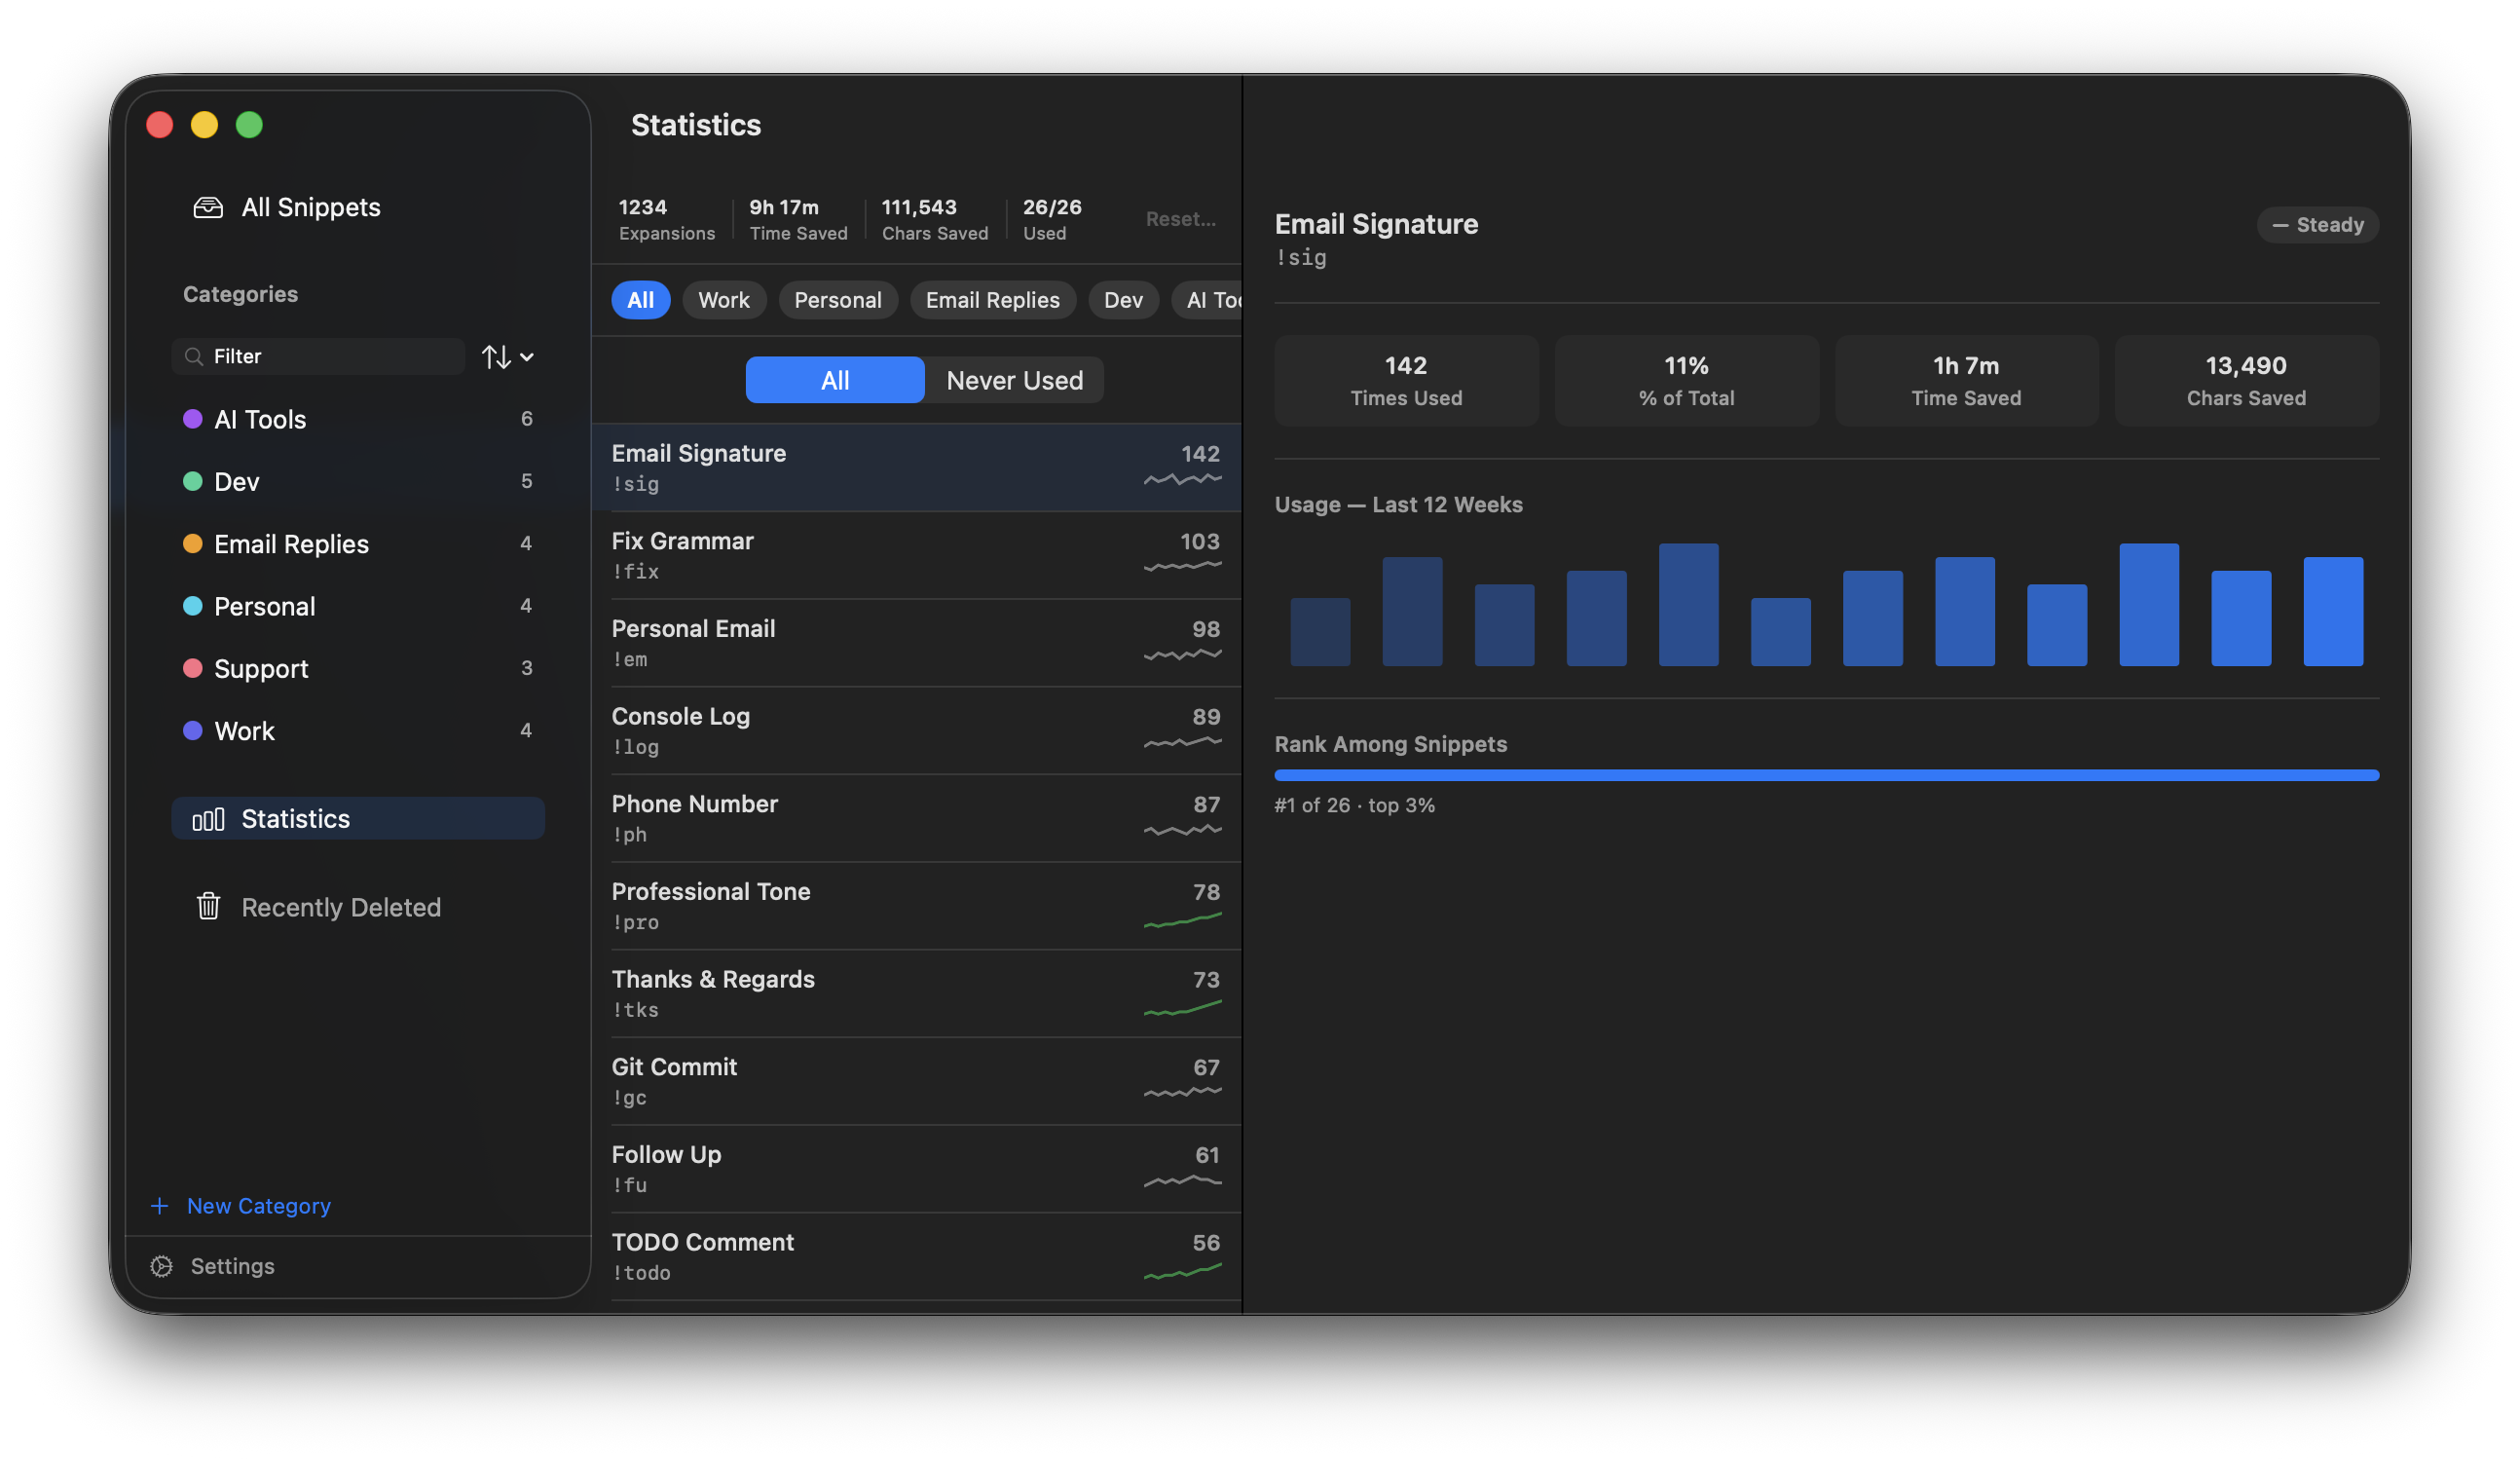
The Statistics dashboard: KPI totals and ranked snippets on the left, a 12-week activity chart and relative usage bars on the right.
What's Tracked
Expansion count
Each time a snippet expands, its count increases by one. Counts persist across app updates and are synced via iCloud when sync is enabled, so they stay in sync across all your Macs.
Weekly history
TypeShift keeps a 52-week rolling history for every snippet. The last 12 weeks are shown as a sparkline in the snippet list and as a bar chart in the detail panel. Weeks with no activity are zero-filled automatically, so gaps in usage are represented accurately.
Trend badges
Each snippet's detail panel shows a trend badge calculated from recent activity:
| Badge | Meaning |
|---|---|
| Trending up | Usage in the last 4 weeks is more than 20% higher than the prior 4 weeks. |
| Steady | Usage is within 20% of the prior period. |
| Trending down | Usage in the last 4 weeks is more than 20% lower than the prior 4 weeks. |
No badge is shown if the snippet has too little history to calculate a trend.
Time saved estimate
TypeShift estimates how long it would have taken to type each expansion manually at your configured typing speed (default: 40 WPM). The time saved per expansion is based on the net characters gained — expansion length minus abbreviation length — so it reflects the actual effort avoided:
characters gained ÷ (WPM × 5) × 60 secondsTime saved scales automatically to a readable format:
| Amount | Display | Example |
|---|---|---|
| Under 1 minute | Seconds | 45s |
| 1 minute – 1 hour | Minutes (and seconds) | 3m 20s |
| 1 hour – 1 day | Hours (and minutes) | 2h 15m |
| 1 day or more | Days (and hours) | 1d 4h |
Characters saved
The net characters TypeShift saved you from typing — the difference between each expansion's length and its abbreviation, summed across all uses. Typing a 3-character abbreviation that expands to 200 characters counts as 197 characters saved.
Usage badge
Each snippet in the snippet list can show a small pill displaying its total expansion count. You can turn it on or off in Settings → Statistics → Show usage badge in snippet list.
Resetting statistics
To clear all recorded counts, open the Statistics view and click Reset… in the KPI bar at the top of the snippet list. A confirmation dialog will appear before anything is deleted.
Settings
All Statistics settings live in Settings → Statistics.
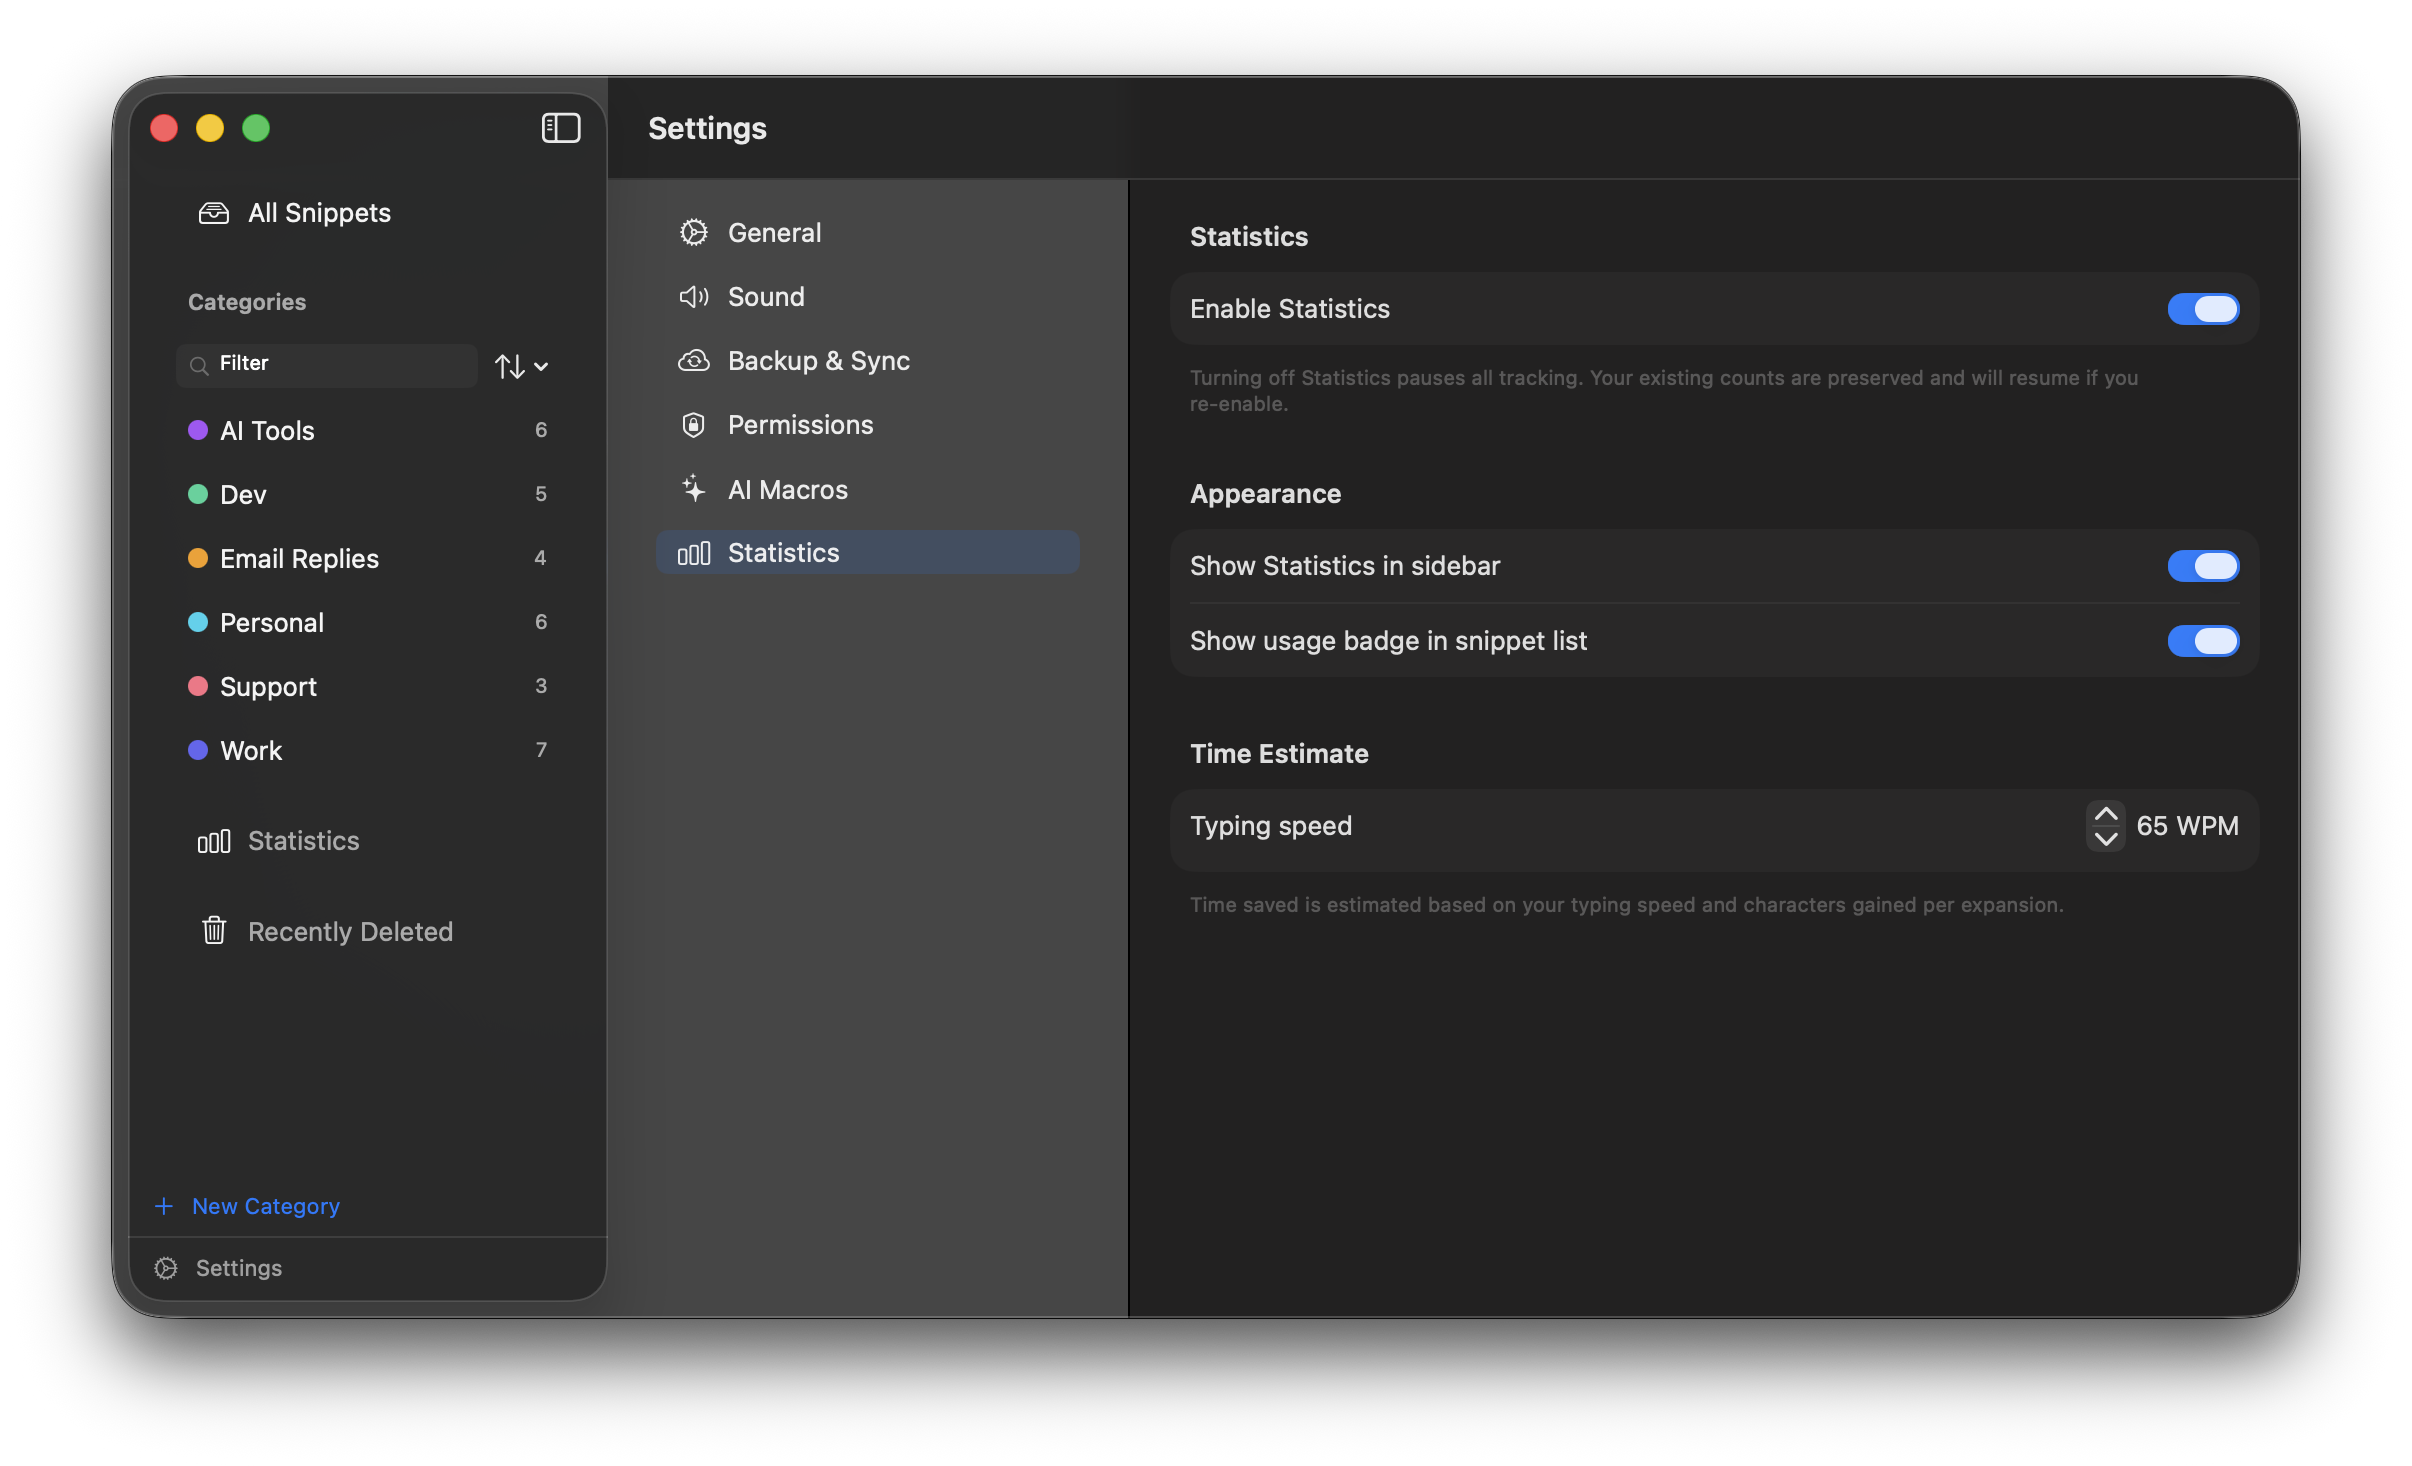
Settings → Statistics. The master toggle controls all tracking. Appearance options appear below when Statistics is enabled.
| Setting | Default | Description |
|---|---|---|
| Enable Statistics | On | Master toggle. When off, expansion counts stop incrementing and the Statistics view and badge are hidden. |
| Show Statistics in sidebar | On | Shows or hides the Statistics row in the main window sidebar. |
| Show usage badge in snippet list | On | Displays an expansion count pill on each snippet row in the snippet list. |
| Typing speed | 40 WPM | Used to calculate the time saved estimate. Adjust to match your actual typing speed for a more accurate figure. Range: 20–120 WPM in steps of 5. |
Sync & Backup
Keep your snippets safe and in sync across all your Macs with iCloud, or export regular backups to any folder.
iCloud Sync
iCloud sync keeps your entire snippet library — snippets, categories, and settings — automatically in sync across all your Macs using your iCloud account. It's opt-in and off by default.
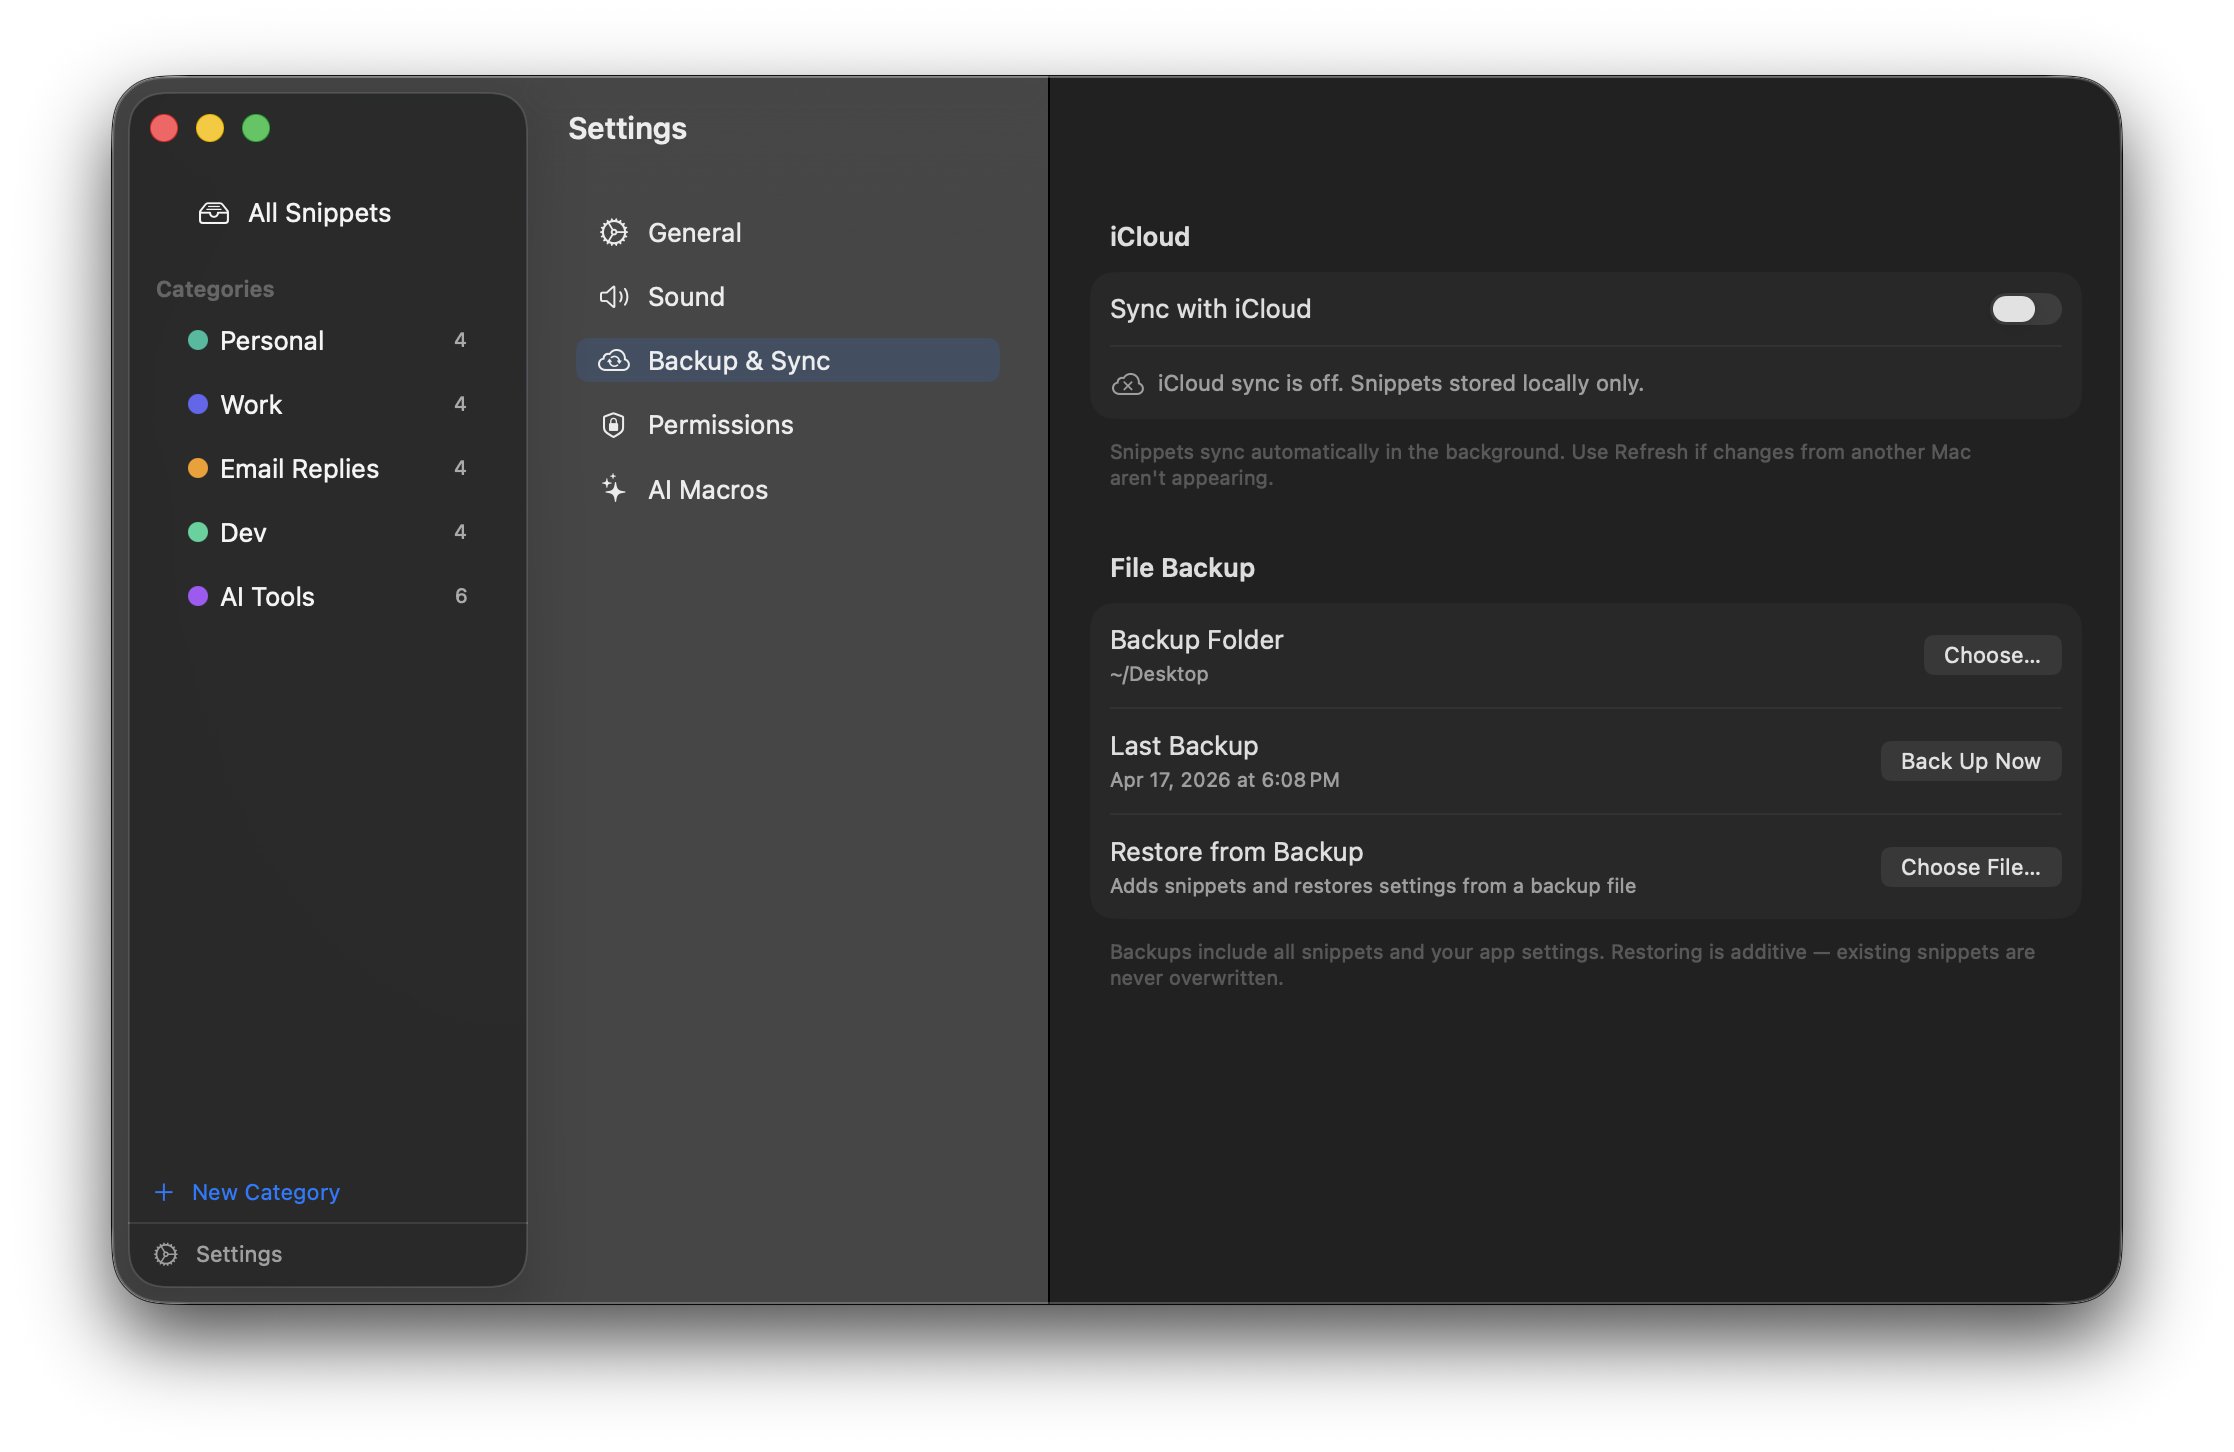
Settings → Backup & Sync. The green checkmark and "Last synced" line confirm sync is active.
Enabling sync
- 1Open Settings → Backup & Sync.
- 2Toggle on Sync with iCloud. TypeShift will relaunch automatically to initialize the CloudKit store.
- 3Repeat on each Mac you want to sync. Make sure all Macs are signed into the same Apple ID.
How long does sync take?
After enabling, existing snippets typically appear on other devices within a few seconds to a couple of minutes. If a Mac has been offline, it will catch up the next time it connects.
Refresh button
If changes from another Mac aren't appearing, hit the Refresh button in Backup & Sync. This reloads the local store and picks up any records CloudKit has already delivered in the background.
Turning sync off
Toggling Sync with iCloud off relaunches TypeShift to detach from iCloud cleanly. After the relaunch, your snippets live only on this Mac and changes you make — including deletions — stay local and are no longer sent to iCloud. Your existing iCloud copy and your other Macs are untouched.
Replace local snippets with iCloud
If this Mac has drifted out of step with your iCloud library and you want iCloud to win, use Restore from iCloud… (in Backup & Sync, shown while sync is on). TypeShift deletes this Mac's snippets and re-downloads the full set from iCloud, so the Mac exactly matches your cloud copy.
Before anything is deleted, TypeShift automatically writes a safety backup to ~/Library/Application Support/TypeShift/Safety Backups/. If that backup can't be written, the restore is cancelled and nothing is touched. The app relaunches to finish.
Troubleshooting
- "Not yet synced this session" — sync hasn't completed a full cycle yet. Wait a minute, then hit Refresh.
- Sync error appears — check that iCloud is signed in and working in System Settings → Apple ID, and that you have sufficient iCloud storage.
- Snippets missing on one Mac — confirm that both Macs have the iCloud Sync toggle on (not just the backup folder set), and that both are signed in to the same Apple ID.
Backup & Restore
TypeShift can automatically export a JSON backup of all your snippets, categories, and settings to any folder you choose — including iCloud Drive, Dropbox, or a local folder.
Setting up a backup folder
- 1Open Settings → Backup & Sync → Backup Folder and click Choose…
- 2Select a folder. TypeShift saves a timestamped JSON file there each time it backs up.
- 3Click Back Up Now to run an immediate backup.
Restoring from a backup
- 1In Settings → Backup & Sync, click Restore from Backup…
- 2Select a
.jsonbackup file. TypeShift will import the snippets and settings it contains.
Licensing
TypeShift is a one-time purchase of $7.99. There's no subscription, no annual renewal, and all future updates are included.
Free Trial
TypeShift includes a full-featured 30-day free trial — no credit card required. The trial starts the first time you launch the app and counts down calendar days regardless of whether the app is running.
When 5 days remain, a banner appears at the top of the window as a reminder. When the trial expires, snippet expansion is paused until a valid license is activated.
Purchasing
Buy TypeShift at typeshift.monogramcreative.co or directly from the in-app paywall. Payment is handled by Lemon Squeezy — your license key is emailed immediately after purchase.
Two licensing options are available:
- Personal — $7.99 — use on up to 3 Macs
- Family — $8.99 — use on up to 5 Macs
Both options are one-time purchases with all future updates included. Select your preferred option during checkout.
For teams and organizations, see Enterprise Licensing.
Activating a License
- 1Open Settings → General and find the License section, or click Activate License from the trial banner or paywall.
- 2Paste your license key into the field and click Activate.
- 3TypeShift validates the key with the Lemon Squeezy server. Once confirmed, the trial countdown disappears and expansion is fully unlocked.
Validation requires an internet connection on first activation. After that, TypeShift works fully offline — it only checks in once per launch when online.
Multiple Macs
Each license key activates on a set number of Macs depending on your plan — up to 3 Macs on the Personal plan, or up to 5 Macs on the Family plan. Simply enter the same key on each Mac.
Deactivating a Mac
If you've reached your activation limit and need to activate on a new machine, you can free up a slot by deactivating an old one: open Settings → General → License and click Deactivate this Mac. That slot is immediately available for another machine.
License not validating?
Enterprise Licensing
For organizations that want to deploy TypeShift across a team or company, we offer enterprise licensing with Single Sign-On (SSO) support. Employees authenticate with their existing corporate identity provider — no license keys to distribute or manage.
How it works
TypeShift integrates with your organization's identity provider via SSO. Employees sign in once using their corporate credentials, and TypeShift is automatically activated on their Mac. IT admins can manage seat limits and revoke access centrally.
Supported identity providers
TypeShift SSO is powered by WorkOS and supports all major identity providers, including:
- Okta
- Microsoft Entra ID (Azure AD)
- Google Workspace
- OneLogin
- JumpCloud
- PingFederate
- ADFS
- Any provider that supports SAML 2.0 or OIDC
Getting started
Contact us at to set up enterprise licensing and SSO for your organization.
Snippets Not Expanding
If your snippets aren't expanding, work through the steps below in order. Most issues are resolved by the first two.
1. Re-grant Accessibility permission
TypeShift uses macOS Accessibility to intercept keystrokes system-wide. Even if the permission appears granted, it sometimes needs to be re-toggled — especially after a macOS update or app reinstall.
- Open System Settings → Privacy & Security → Accessibility
- Find TypeShift in the list and turn the toggle off
- Turn it back on
- Quit and relaunch TypeShift — this step is required; the event tap only starts at launch
2. Check the expansion toggle
There are two places expansion can be turned off:
- Global toggle — click the TypeShift menu bar icon and confirm the main on/off switch is enabled
- Per-snippet toggle — open the snippet in TypeShift and check that the lightswitch icon in the toolbar is on. A snippet that is individually disabled won't expand even if the global toggle is on
3. Check your trial or license status
If the 30-day free trial has expired, TypeShift stops expanding snippets until a license is activated. Open TypeShift and check whether a trial-expired message or paywall is shown. Purchase a license or activate an existing one to resume expansion.
4. Check the abbreviation
TypeShift matches abbreviations by watching your typing buffer. A few things can silently clear the buffer:
- Don't use spaces or punctuation mid-abbreviation — any non-letter/number character resets the buffer, so the abbreviation must be typed as one uninterrupted sequence
- Abbreviations are case-sensitive by default — make sure you're typing the exact case you saved
- Keep abbreviations short (3–6 characters) and unique — very short sequences like
hican fire unexpectedly in normal typing
5. Check App Rules
If a snippet has an App Rule set to Include only or Exclude, it will be silently skipped in apps that don't match the rule. Open the snippet and click the filter icon (⊜) in the toolbar to review the rule. Switch the rule to Global to expand everywhere.
6. Test in a known-good app first
Some apps block synthetic keyboard events and clipboard injection, which prevents expansion entirely:
- Good test apps: TextEdit, Notes, Pages, Mail compose window
- May not work: Terminal, password managers (1Password, Bitwarden), browser URL/address bars, and some Electron apps
- TypeShift's own window: expansion is intentionally suppressed while TypeShift itself is focused — test in another app
If expansion works in TextEdit but not in another specific app, that app is likely blocking it.
7. Rich text snippets and clipboard managers
Rich text snippets expand via the clipboard (paste). If you use a clipboard manager like Paste, Maccy, or CleanClip, it may intercept the temporary clipboard content before TypeShift can paste it. Try temporarily disabling your clipboard manager to test, or switch the snippet to plain text if formatting isn't needed.
Still stuck?
If none of the above resolves the issue, reach out and include the following details:
- macOS version (Apple menu → About This Mac)
- TypeShift version (TypeShift → Settings → General → About)
- The abbreviation and expansion you're testing with
- The app you're testing in
- Whether expansion works in TextEdit